Loss vs bslbslbsl (791)
| Opening: King’s Indian Defense | Result: 1-0 (Time) | Time Control: 10 min Rapid | Unrated |
Game Overview
Playing as Black against a slightly higher-rated opponent, I set up a King’s Indian Defense and managed to build a strong attacking position on the kingside. White’s mistake on move 14 (g4) gave me a nearly four-point advantage. I had real attacking chances with my queen, bishop, and rook all pointed at the king. But I never found the right way to convert the attack. A blunder on move 20 gave away my bishop for nothing, and from there I was fighting to survive. I managed to regroup and set up a second attack, but with time running low I traded down into a lost endgame and flagged. The ideas were there, but the calculation wasn’t deep enough.
The King’s Indian Setup (Moves 1-7)
1. d4 Nf6 2. Bf4 g6 3. e3 Bg7 4. Nd2 O-O 5. Be2 d6 6. h4 h5 7. Ngf3 Nbd7
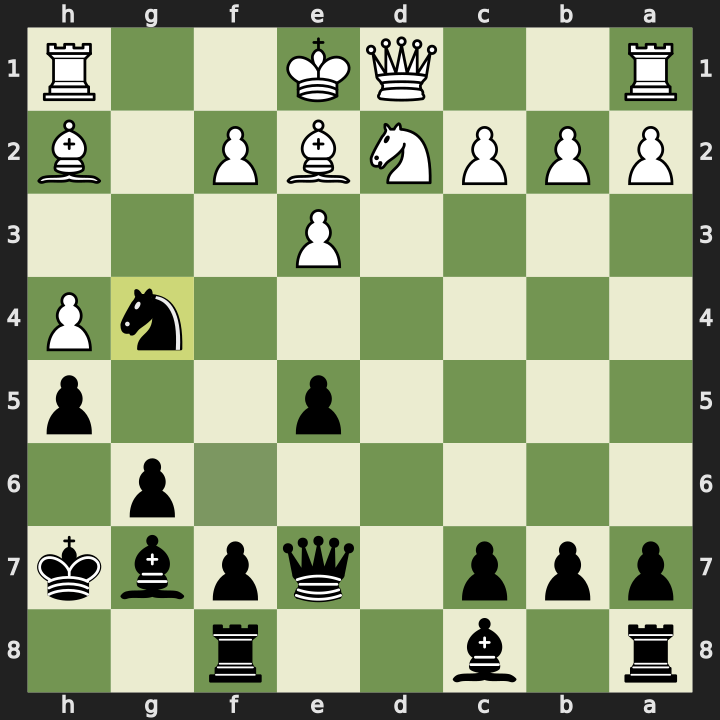
My opponent opened with 1. d4 and against that I like to play the King’s Indian Defense. I fianchetto’d and castled without any issues. On move 6, White played h4 which I really didn’t want to allow any further forward, so I played h5 to block it. One thing I wasn’t sure about at the time: does that weaken g5? As we’ll see later, it does allow a knight to land on g5.

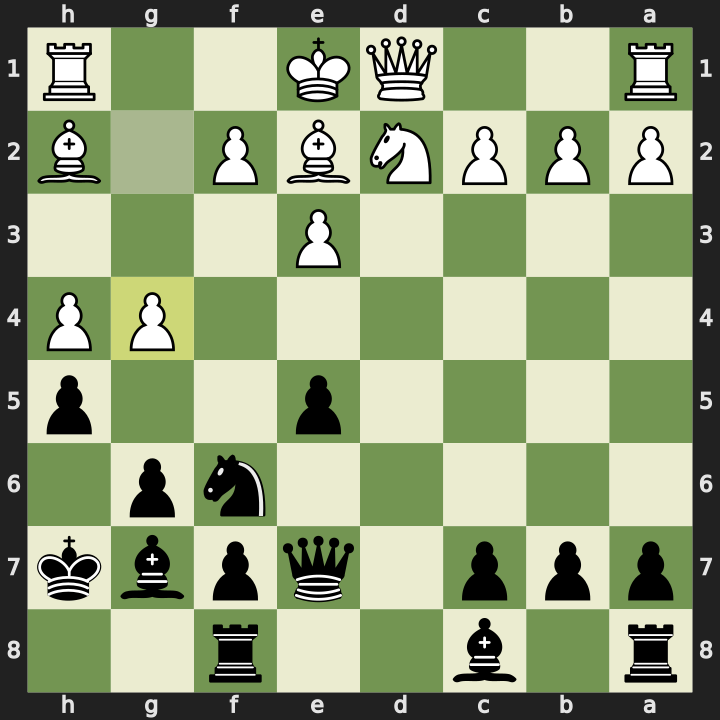
The Central Strike and Knight Tactics (Moves 8-15)
8. Ng5 e5 9. dxe5 dxe5 10. Bh2 Nh7 11. Nxh7 Kxh7 12. Bg3 Qe7 13. Bh2 Nf6 14. g4 Nxg4 15. Bxg4 Bxg4
After some development I struck the centre with 8…e5, feeling pretty good that the trades would leave me well placed. White’s dark-squared bishop was forced to retreat, and I saw an opportunity to jump forward with my knight to g4 and keep up the pressure. But I was still worried about White’s knight on g5, so I prioritised kicking it out by moving my knight to h7 where White had the option to trade. That let me bring in my other knight from d7, aiming to get it to g4 eventually.
I noticed that my knight on d7 was the main protector of the e5 pawn, so to keep it protected I brought my queen up to e7. That also allows the rooks to be connected in future.
Then White played 14. g4, which was a mistake. I took with 14…Nxg4, White recaptured with the light-squared bishop, and I took back with my bishop, attacking the queen.
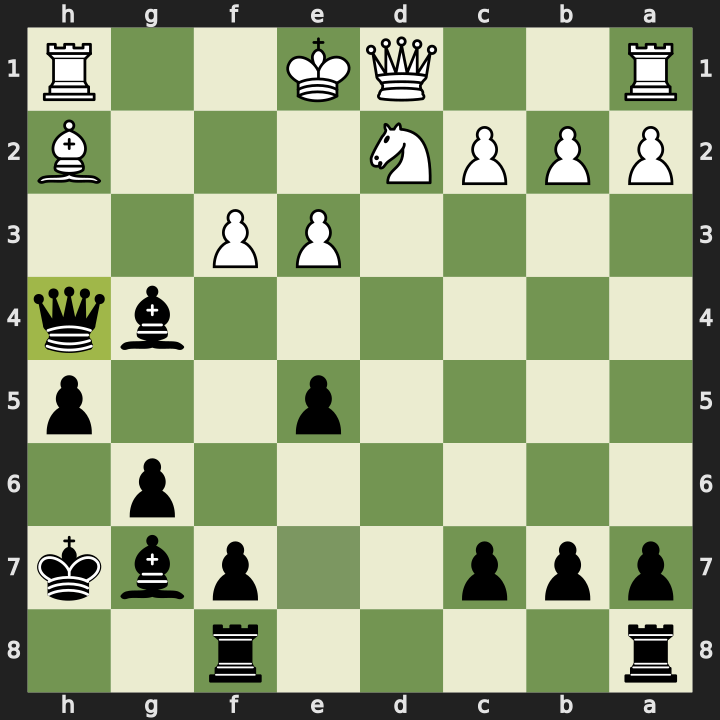
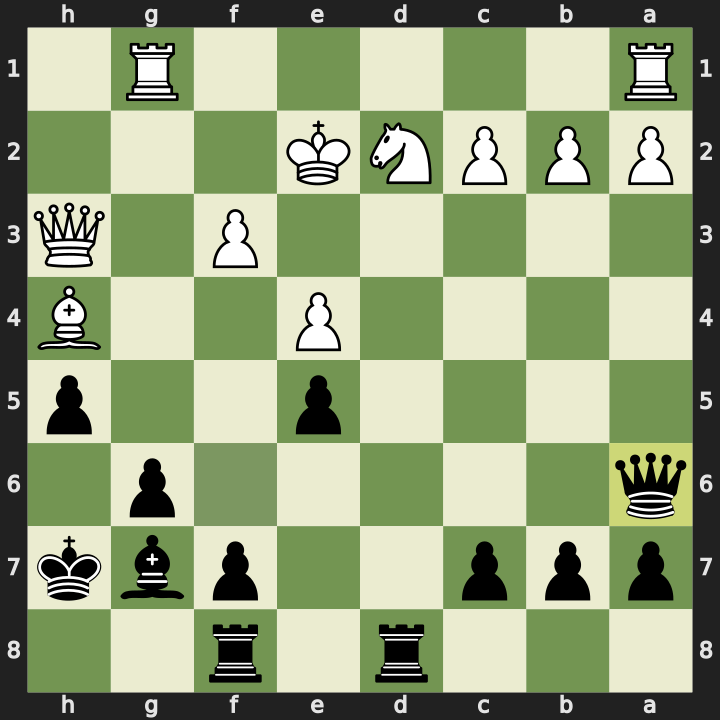
The Kingside Attack (Moves 16-19)
16. f3 Qxh4+ 17. Ke2 Bh3 18. Qe1 Qg5 19. Qg3 Qf5
I was pretty happy with this position. It felt like I had the initiative. White blocked the attack on the queen with a pawn, and looking for the most forcing move, I saw I could play 16…Qxh4+ with check. I didn’t have much of a follow-up in mind after this, but I thought it could lead to a mate somewhere down the line. Not many squares for the king to run to.
The king evaded the check and I needed to move my bishop since it was still under attack by the pawn. I wanted to keep it close to the king so I moved it over to h3. I figured that might also block an attack on the queen by the rook on h1 should the bishop on h2 move.
Interestingly, White was very keen to trade queens at this point. They must have felt fairly threatened. They brought their queen over to e1 offering a trade, but I knew that trading wasn’t the right move for me given I was trying to attack, so I moved my queen out of the way. White offered a trade again. This one seemed even less advantageous, so again I moved my queen, keeping the support of my bishop on h3.
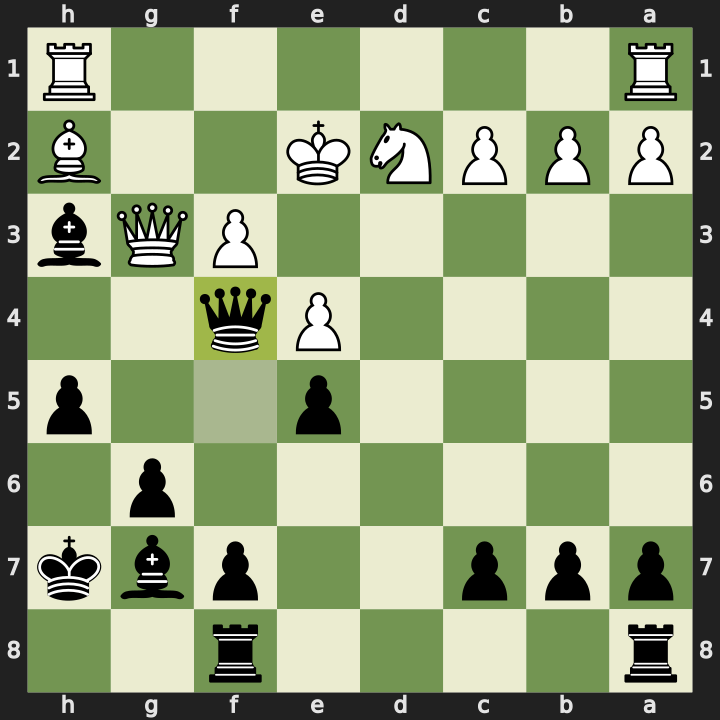
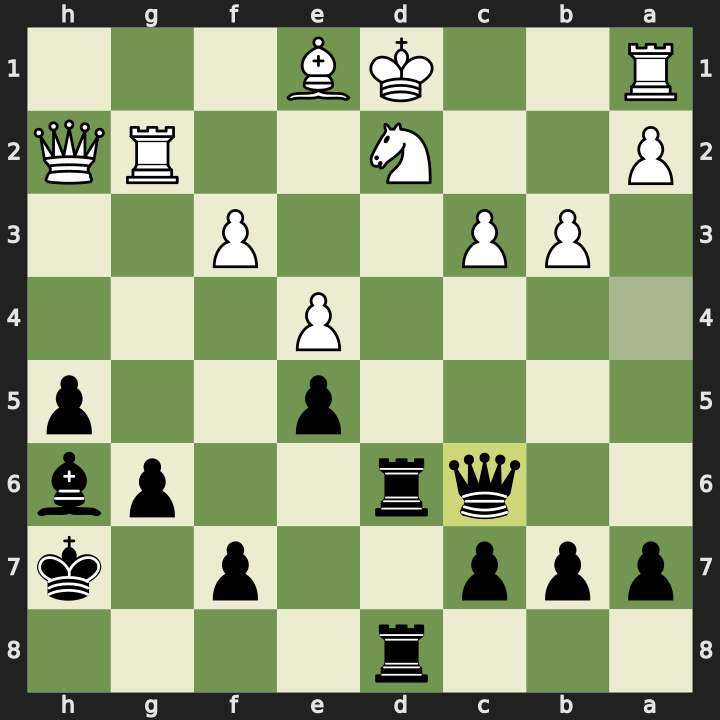
The Blunder (Move 20)
20. e4 Qf4 21. Qxh3
White attacked my queen with a pawn, and here I think I tried to get a bit too clever. For some reason I thought it would be preferable to trade on f4 and take back with my pawn, opening up the centre for my rooks. I completely missed that by doing so I was giving up the protection of my bishop on h3. That’s a pretty big blunder, considering I was already down nearly three minutes on the clock. It’s not that I wasn’t thinking. I just wasn’t thinking about defence. I was only thinking about the trade.
White scooped up my bishop with a discovered attack on my queen. I needed to get it away but it was almost boxed in. At this point I’d given the initiative over to White and I was just trying not to lose.
The Recovery Attempt (Moves 21-30)
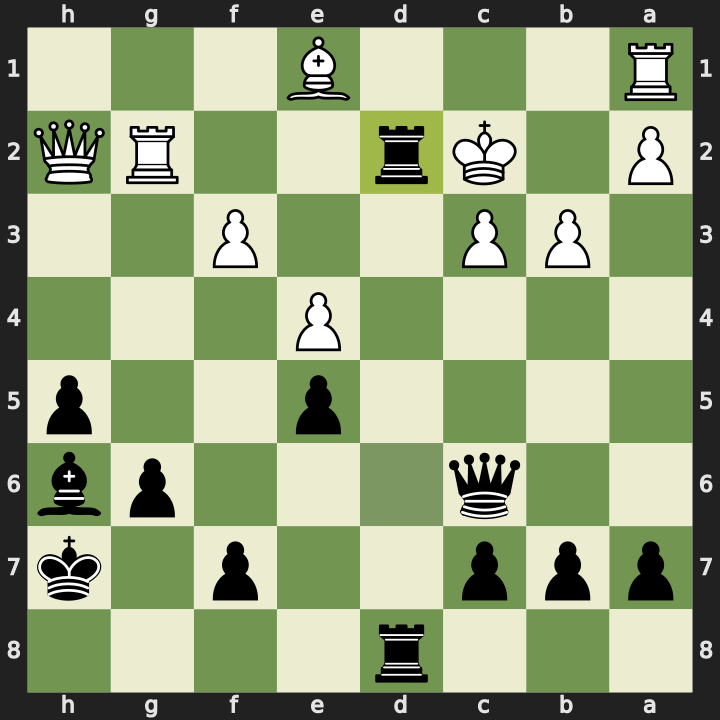
21…Qg5 22. Rhg1 Qf6 23. Bg3 Rad8 24. Bh4 Qa6+ 25. Kd1 Rd6 26. Be1 Bh6 27. Rg2 Rfd8 28. Qh2 Qa5 29. c3 Qa4+ 30. b3 Qc6
With White’s queen and rook pointing towards my king, my new plan was to attack the centre using my rooks and queen. So I dropped my queen back one more square to f6, with a lot of space available on the sixth rank should I need it.
White kept up the pressure on my queen with 24. Bh4. Then I noticed there was a check on a6. I’m glad I saw this because I often miss these checks on the king from the flanks. I thought this might be the start of something. If I could get my bishop to h6, my rook on the d-file, and my queen on the diagonal, then I’d have a few pieces pointed towards the centre where the king was.
My rook was under attack by the bishop, so I needed to bring it forward a couple of squares out of sight of the bishop and queen. White saw my plan and dropped the bishop back to defend the knight in front of the king.
Best case scenario, I had four pieces to attack with: two rooks, a bishop, and a queen. White had three defenders and the king. I also had a pawn majority on the kingside, so I felt like there was still a chance if I could find the right moves.
Trading Down and Time Trouble (Moves 31-42)
31. Kc2 Rxd2+ 32. Bxd2 Rxd2+ 33. Rxd2 Bxd2 34. Qxd2 f5 35. exf5 gxf5 36. Rd1 e4 37. Qd7+ Qxd7 38. Rxd7+ Kg6 39. fxe4 Kg5 40. exf5 Kxf5 41. Rg7 h4 42. Kd3 1-0
After counting properly, I realised that the attack on d2 was just going to be a big trade, and at the end of it all White would be up a rook. My only chance would be to promote a pawn supported by the king. With 25 seconds left on the clock, I figured it was worth a shot. At least it was a fairly simple plan: trade everything and go for promotion.
White had other ideas though, and after the trades I was in a completely lost endgame. I tried to activate my king and push my passed kingside pawns, then ran out of time. I suspect this was a win for White regardless, but the clock made it academic.
Engine Review
Opening: The engine prefers 6…c5 over 6…h5. h5 is fine but not the best. I need to study the best way to deal with an h-pawn barrelling towards a fianchetto bishop setup.
White’s wasted bishop moves: White’s bishop went Bf4-Bh2-Bg3-Bh2, shuffling back and forth without purpose. This is where Black started to gain an advantage.
14. g4 was White’s first mistake. It opens up the kingside and gives Black a nearly four-point advantage after 14…Nxg4.
Pieces on the h-file were still good, maintaining the full-point advantage through the queen check and bishop placement on h3.
19…Qg5 wasn’t a great move. It was okay, but at this stage I should have realised I didn’t have a clear attacking plan and White was sufficiently defended. The engine recommends dropping the queen right back to b7 to regroup. There were some weak pawns on the queenside that could be picked up, or just put as much pressure as possible in the centre.
20…Qf4 was the blunder. Giving up protection of the bishop on h3 for nothing.
The second attack had promise. After pinning the knight to the king and lining up pieces on it, the engine shows an idea using the queen to pin the bishop, giving a chance to exploit the pin on the knight. With three attackers and two defenders, the continuation would have left me with a queen against bishop and rook, plus a pawn majority on the kingside.
31…Rxd2+ was a blunder. With 10 seconds on the clock I couldn’t find a better move. After the trades, White had a comfortable winning position.
Reflections
I was playing a higher-rated opponent and managed to build genuine attacking chances. The ideas were there, but turning them into a concrete win was the missing piece.
What went well:
- The King’s Indian setup was solid and I enjoyed playing it against d4. Want to keep doing this.
- The opening attack after White’s g4 mistake was well played. Taking with the knight and getting pieces active on the kingside was satisfying.
- Recovering from the blunder to set up a second attack showed resilience. Finding Qa6+ from the flank was good awareness.
What to work on:
- Calculation depth. I never actually got close to threatening checkmate or winning significant material. The attacks were nearly there, but I needed to calculate a few moves further to find the winning tactics.
- Defence while attacking. The Qf4 blunder happened because I was only thinking about offence and completely forgot my bishop on h3 was hanging. Always check what you’re leaving behind.
- Time management. I told myself I’d rather lose time than lose to a blunder. Turns out you end up blundering because you’re low on time anyway. I need to look for good enough moves that keep plenty of time on my clock rather than trying to calculate so far ahead.
- Study how to respond to h4 against the King’s Indian fianchetto. The engine says c5 was better than h5.
Full PGN:
1. d4 Nf6 2. Bf4 g6 3. e3 Bg7 4. Nd2 O-O 5. Be2 d6 6. h4 h5 7. Ngf3 Nbd7
8. Ng5 e5 9. dxe5 dxe5 10. Bh2 Nh7 11. Nxh7 Kxh7 12. Bg3 Qe7 13. Bh2 Nf6
14. g4 Nxg4 15. Bxg4 Bxg4 16. f3 Qxh4+ 17. Ke2 Bh3 18. Qe1 Qg5 19. Qg3 Qf5
20. e4 Qf4 21. Qxh3 Qg5 22. Rhg1 Qf6 23. Bg3 Rad8 24. Bh4 Qa6+ 25. Kd1 Rd6
26. Be1 Bh6 27. Rg2 Rfd8 28. Qh2 Qa5 29. c3 Qa4+ 30. b3 Qc6 31. Kc2 Rxd2+
32. Bxd2 Rxd2+ 33. Rxd2 Bxd2 34. Qxd2 f5 35. exf5 gxf5 36. Rd1 e4 37. Qd7+
Qxd7 38. Rxd7+ Kg6 39. fxe4 Kg5 40. exf5 Kxf5 41. Rg7 h4 42. Kd3 1-0
Further Reading
- King’s Indian Defense: Complete Guide - The opening I played as Black
- How To Convert An Advantage - Relevant to converting attacking positions