Series vs D-R-Julian: 2W-1L
| Opponent: D-R-Julian | Format: 3-game series | Result: 2W-1L | Time Control: 10 min Rapid | Rated |
I really enjoyed this three game series. It was a chance to play an opponent with a unique style, and I felt confident that I understood their plans and was able to see the weaknesses in their positions. My opponent’s trademark was pushing lots of pawns in the opening, grabbing space but leaving pieces undeveloped and weaknesses in the position. Each game was largely decided by blunders, but I think there’s something to be said for a solid opening. Taking the centre, developing pieces, connecting rooks and castling the king before going on the attack. It makes it less likely that you’ll blunder because you have a well coordinated position, which I feel I had in these games.
Game 1: Win vs D-R-Julian (719) as White
| Result: 1-0 (Checkmate) | Moves: 34 |
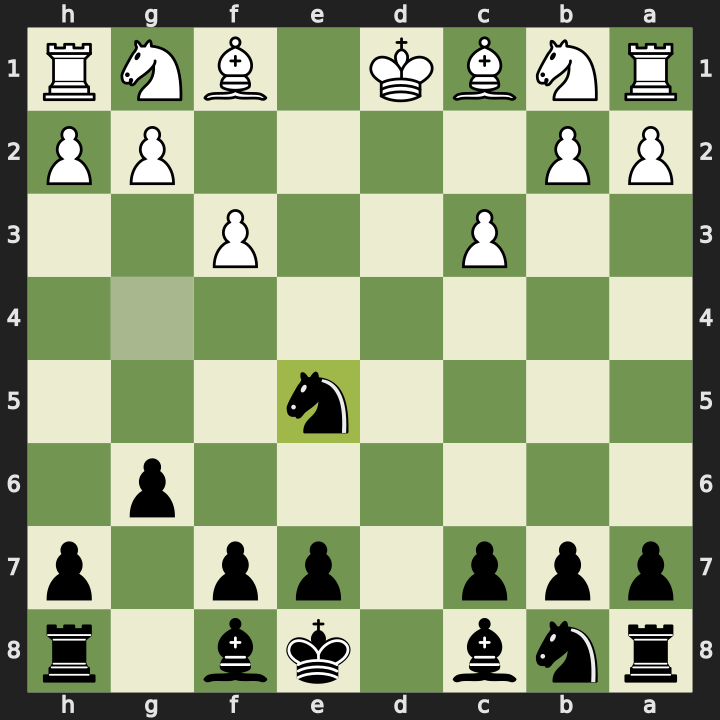
Pawn Weaknesses (Moves 1-6)
1. d4 d6 2. Nf3 c5 3. b3 b6 4. e3 f6 5. Bd3 e5
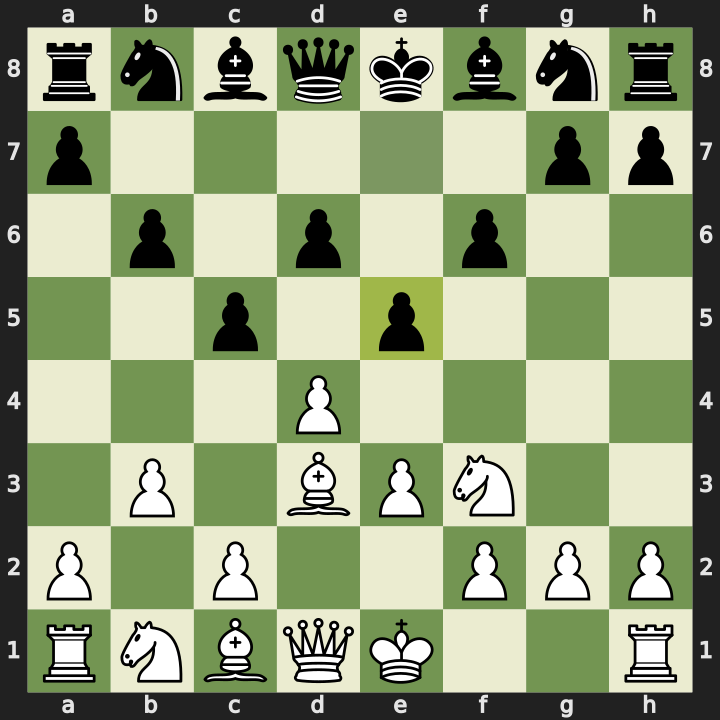
The opening for game one was interesting because my opponent spent the first five moves just pushing pawns. I think this is something like a Stonewall structure, but the first thing I noticed is there are a lot of weaknesses on the light squares because almost all the pawns have been pushed onto dark squares. While it does make it hard for my knight to manoeuvre, I was waiting for an opportunity to slip through the gaps and take advantage of the opponent’s lacking development.
The Bishop Pin (Moves 6-10)
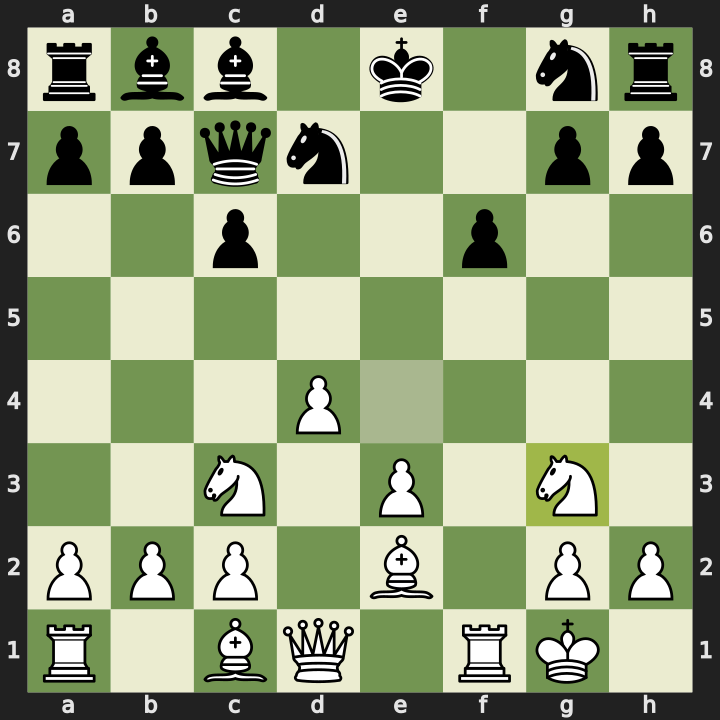
6. Bb2 Nc6 7. Bb5
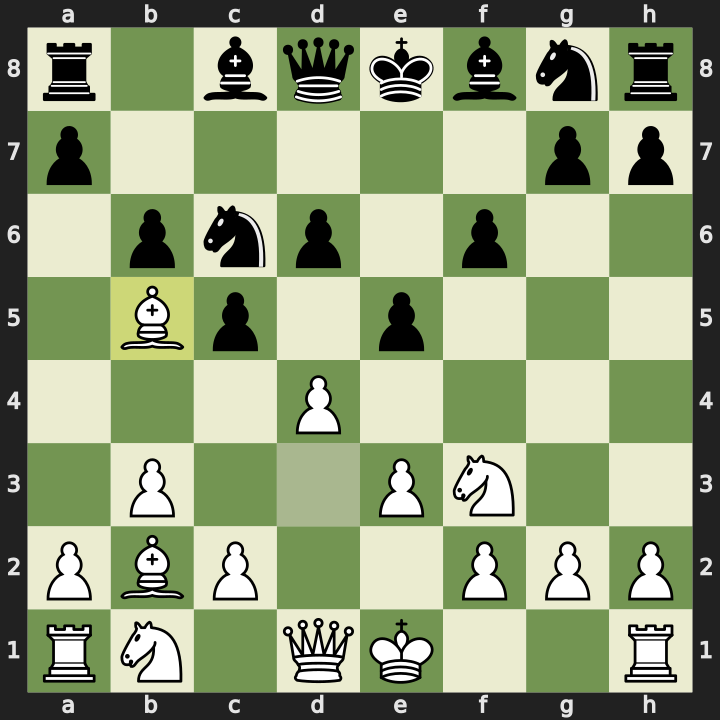
On move 7 I saw a chance to pin my opponent’s knight to their king. Normally I don’t really love these knight pins where the opponent can just attack the bishop with a pawn and force a trade immediately. But in this case I saw a pretty interesting follow-up: because all the pawns have been pushed, if I take the knight next turn it comes with check, and I can win a rook.
7…Bb7 8. d5 a6 9. dxc6
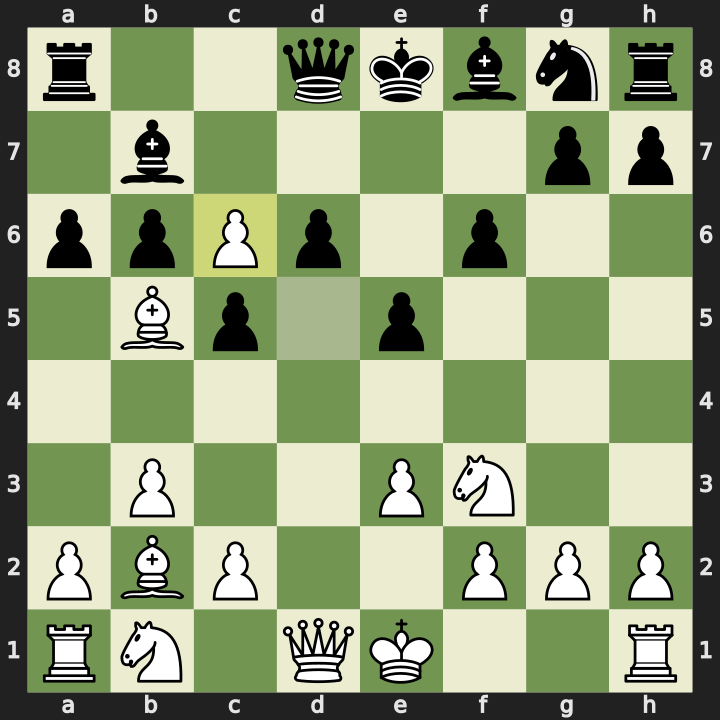
My opponent made an attempt to defend, but I could see that as long as I got the move order right I’d come out on top after the trades. If I take with my pawn first then retake with the bishop, I still get the check and win the rook.
9…Bxc6 10. Bxc6+ Ke7
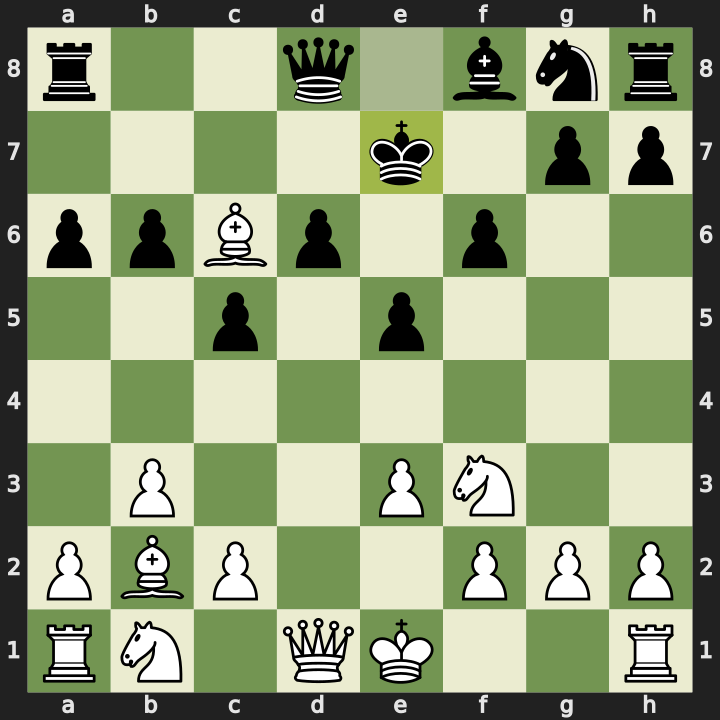
Massive Material Advantage (Moves 11-15)
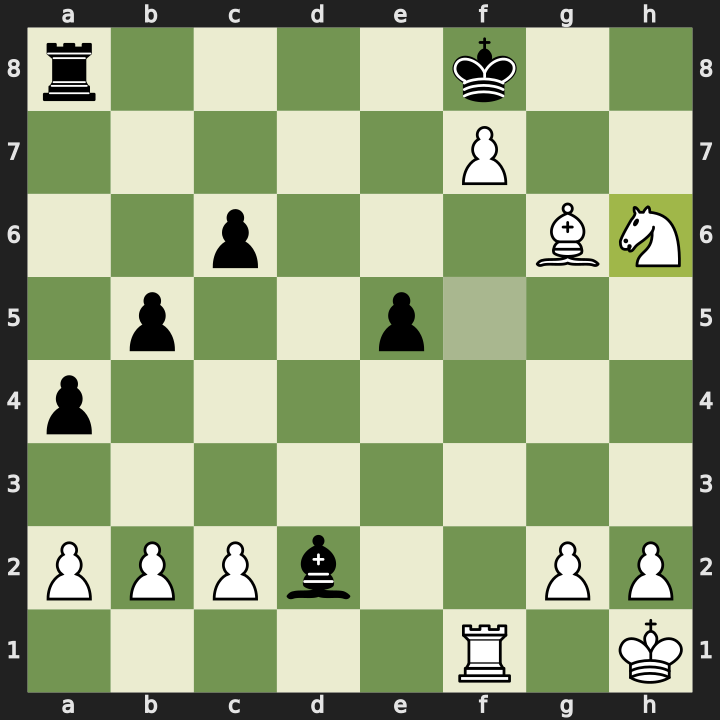
11. Bxa8
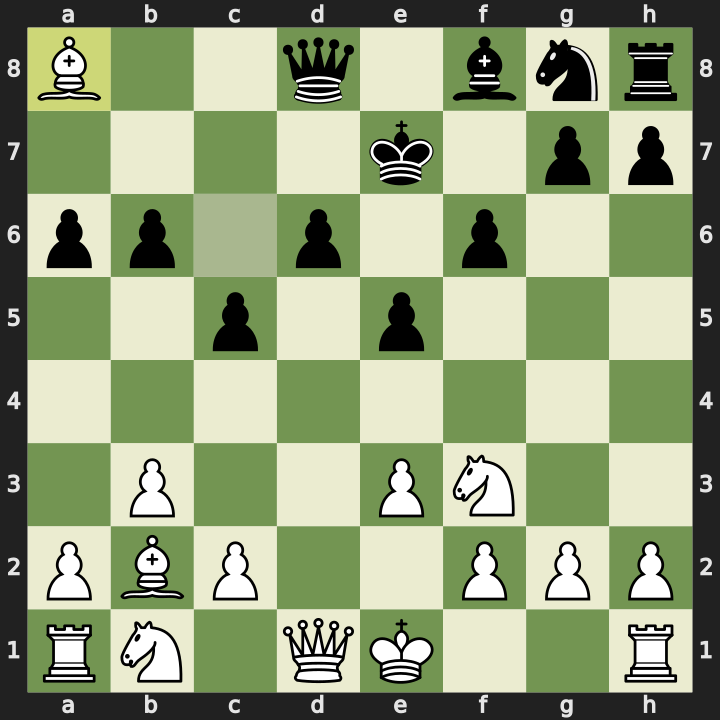
By move 11 I’m up a piece and a rook, seven points in material, feeling really good about the position.
11…Qxa8 12. O-O e4 13. Nh4 g6 14. g3 f5 15. Bxh8
On move 14 my opponent made a mistake pushing their f-pawn without considering my bishop on b2 pointing at their other rook. Easy capture on h8 for me.
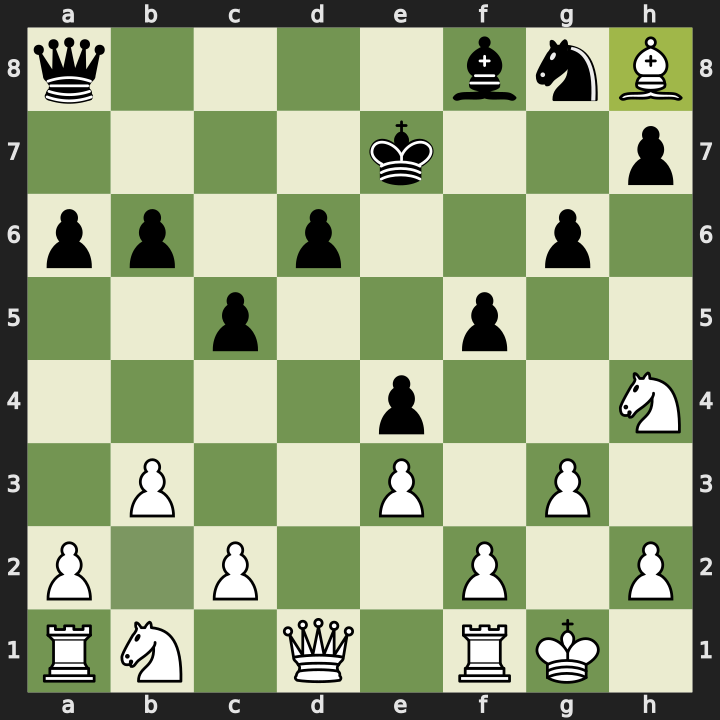
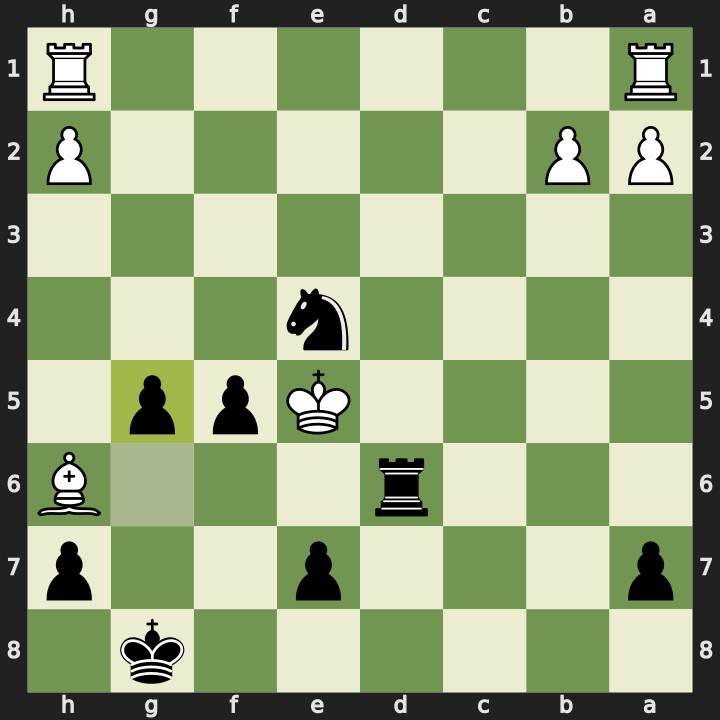
Chasing the King (Moves 15-34)
We made a few more trades, and by move 27 I’m up quite a bit of material, 15 points, with two extra rooks and a knight. My opponent was just left with their queen at this point. I was just trying to not blunder my queen and keep enough material on the board for a checkmate.
15…g5 16. Nxf5+ Ke6 17. Qg4 Nf6 18. Bxf6 Kxf6 19. Nc3 h6 20. Nxe4+ Kg6 21. Ne7+ Bxe7 22. Qe6+ Bf6 23. Nxf6 Kg7 24. Rad1 Qf3 25. Rxd6 b5 26. Rd7+
I think I played slightly inaccurately by allowing the king to take my knight. I wasn’t too worried about it because the king had been pushed forward towards my pawns and was on the edge of the board with very little protection. But it feels like there was a better way, maybe knight to e5 to attack the queen, which would have allowed the knight to stay in the game.
26…Kg6 27. Ng4+ Kh5 28. Qxh6+ Kxg4 29. h3+ Kf5 30. Qf8+ Ke4 31. Re7+ Kd5 32. Qxf3+
Eventually I was able to chase Black’s king into a position where it was on the same file as the queen, then check it again to push it out of the way, allowing me to pick up Black’s queen.
32…Kd6 33. Qf6+ Kd5 34. Rd1#

Engine Review (Game 1)
The engine says I played with 83.2% accuracy with no mistakes, no blunders, and one miss. Really happy with that. By move 7 the engine is already showing a +4.2 advantage to White. It really shows that pushing pawns and failing to develop pieces is a very risky strategy.
On move 26 I missed mate in one with Qg8. The remaining moves were all good, leading towards checkmate.
Game 2: Loss vs D-R-Julian (728) as Black
| Result: 0-1 (Resignation) | Moves: 48 |
Pirc Defence and Early Queen Exchange (Moves 1-7)
1. e4 d6 2. d4 Nf6 3. c3 g6 4. e5 dxe5 5. dxe5 Qxd1+

I used the Pirc Defence and played the line that leads to an early queen exchange. I’m fairly comfortable playing this because it weakens White’s attacking chances. Similar to game one, my opponent made many pawn moves and really only developed knights, neglecting to castle the king and get to safety.
6. Kxd1 Ng4 7. f3 Nxe5
I could see on move 12 that the d-file was wide open and I could slide a rook across to check the king. That made me think the White king was not in a safe place.
The Blunder (Move 15)
8. Nh3 Bg7 9. Nf4 O-O 10. Nd2 Nbc6 11. Ne4 Bf5 12. g4 Bxe4 13. fxe4 Nxg4 14. Ke1 Nce5 15. Nd5
Move 15 was where I really blundered. All I had to do was push my c-pawn to c6 to kick the knight. Even though the knight could come in and grab a pawn on e7, because it has no other pieces to coordinate with, it’s just a pawn even with the check. For some reason I wanted to defend that pawn and avoid the check, but in return I gave White a chance to fork my rooks by taking c7 instead.
15…Rfe8 16. Nxc7
This is the kind of mistake I really can’t afford to be making. I wasted time and made a bad move.
An Interesting Missed Opportunity (Move 29)
16…Rac8 17. Nxe8 Rxe8 18. Bb5 Nc6 19. Bxc6 bxc6 20. Ke2 Bd4 21. cxd4 Nf6 22. e5 Ne4 23. Bh6 Rd8 24. Ke3 f5 25. e6 Rd6 26. d5 cxd5 27. Kd4 Rxe6 28. Kxd5 Rd6+ 29. Ke5
It was a really interesting position on move 29. White’s king had marched all the way forward to the 5th rank, meanwhile White’s rooks were still on their starting squares. I’m down a rook at this point. I wasn’t expecting to win, but with a knight on the board and the king in the centre, maybe there’d be a chance for a fork or something.
29…g5
I saw what I thought was an interesting move that would trap White’s bishop by pushing g5. But it wasn’t as good as I thought. It just allowed a trade of White’s bishop for my knight. However, there was a really interesting line at this point that I could have taken if I’d seen it: Nf2 threatening the rook on h1, then if White plays a very natural move like Rf1 to counter-attack the knight, Black plays Nd3# checkmate. I thought that was amazing. There are often these chances to make a sudden comeback in chess if you make risky moves like bringing your king into the centre while there are still a number of pieces in play and without the support of pawns or other pieces.
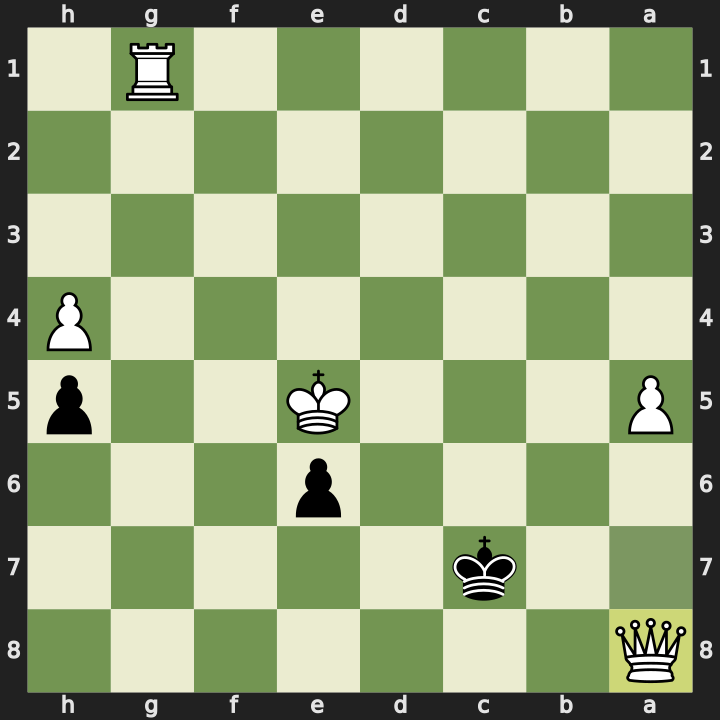
Promotion and Resignation (Moves 30-48)
In the game I played on until White promoted a pawn and then I resigned.
30. Kxf5 Rxh6 31. Kxe4 Kf7 32. Rhf1+ Kg6 33. Rac1 Kh5 34. h3 Re6+ 35. Kf5 Rf6+ 36. Ke5 Rxf1 37. Rxf1 Kg6 38. a4 h5 39. Rg1 g4 40. h4 Kf7 41. b4 e6 42. b5 Ke7 43. a5 Kd7 44. Rc1 g3 45. b6 g2 46. bxa7 g1=Q 47. Rxg1 Kc7 48. a8=Q
Engine Review (Game 2)
The engine scores my accuracy at 73.5% and my opponent at 81.9%, with me making one blunder, one miss, and two mistakes. Definitely a game to learn from. The blunder on move 15 was the turning point. Had I just pushed c6 to kick the knight, the game would have been much closer.
Game 3: Win vs D-R-Julian (720) as White
| Result: 1-0 (Checkmate) | Moves: 43 |
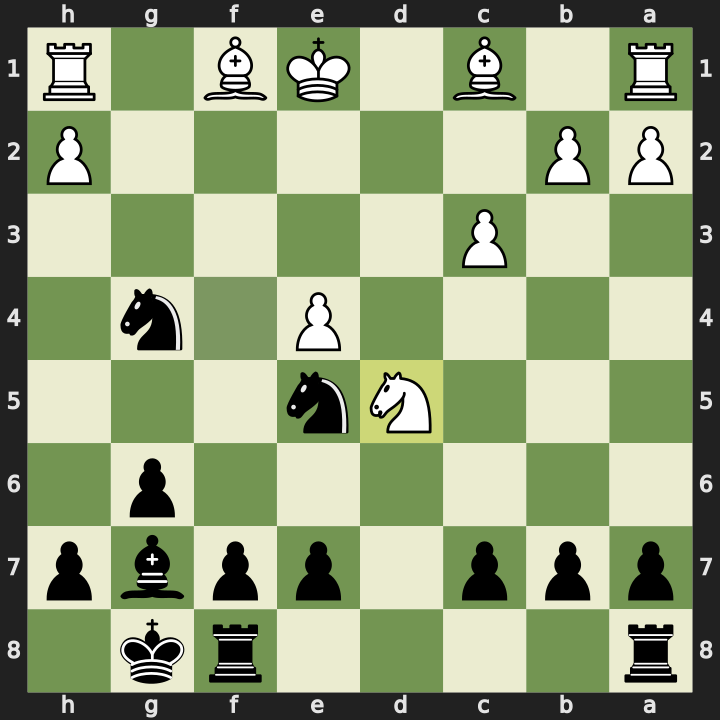
Opponent’s Pawn Aggression (Moves 1-5)
1. d4 c6 2. Nf3 f6 3. e3 e5 4. Be2 e4
Game three was fun. I was starting to get a feel for my opponent’s play style. Once again, my opponent made quite a number of pawn moves in the opening, grabbing as much space as they could with a pawn on e4 and a solid pawn chain. My plan was to attack that pawn chain at e4 with my f-pawn. It can be a bit risky to push the f-pawn after castling the king, but I also have pawns blocking the dark square diagonal on e3 and d4, so I wasn’t too worried about that being a risk.
Breaking Through (Moves 5-11)
5. Nfd2 d5 6. O-O Nd7 7. Nc3 Bd6 8. f3
8…Bb8 9. fxe4 dxe4 10. Ndxe4 Qc7
Blocking the Checkmate Threat (Move 11)
11. Ng3
Black made a mistake by being too eager to set up a battery of their bishop and queen looking for a quick checkmate, failing to secure the centre they had managed to hold. I had a pawn and two knights all aimed at e4, so I was about to take back some space. I saw Black’s battery and knew exactly what they were threatening. It would have been checkmate if I hadn’t found a good move. I could have moved my rook to allow my king to escape the check, but I found what I think is a better move. The knight on g3 makes it impossible for Black to attack h2. At this point Black has lost control of the centre, hasn’t really developed much, hasn’t castled, and I feel like I’m in a better position here.
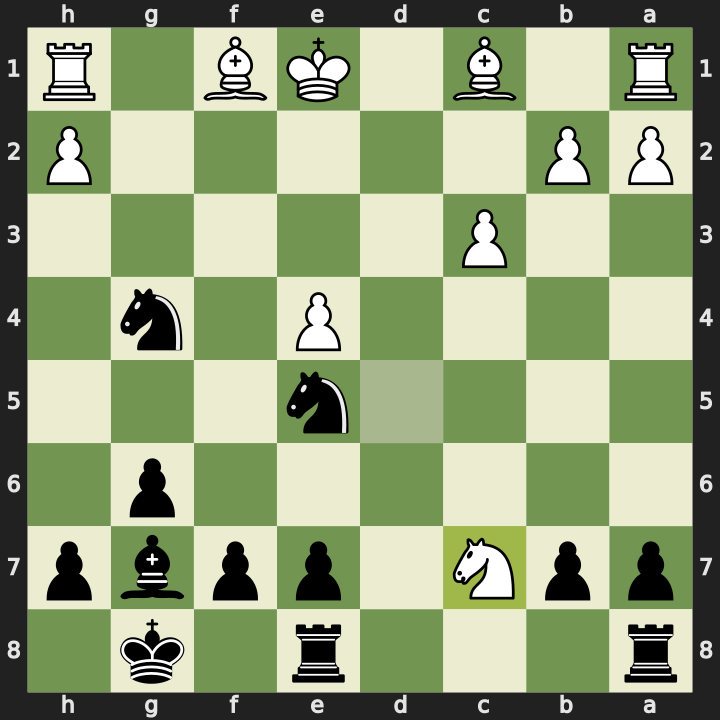
Manoeuvring and Black’s Knight Blunder (Moves 12-16)
11…Nf8 12. e4 Ng6 13. Bd3 N8e7 14. Nce2 O-O 15. Bf4 Ne5
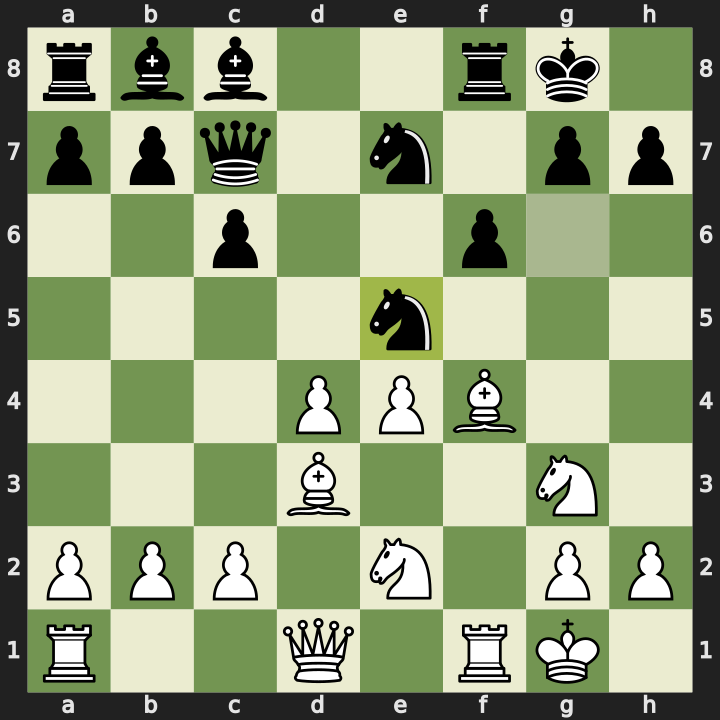
I calmly moved my pieces over towards the kingside, feeling confident that once Black castled I’d be able to cook up an attack. Black blundered a knight on e5 allowing me to take back with a pawn. I’m not sure if that was an intentional sacrifice, but it wasn’t a good move. Knowing how I played in the last game, I wanted to basically just play it safe and simplify the position and get a win.
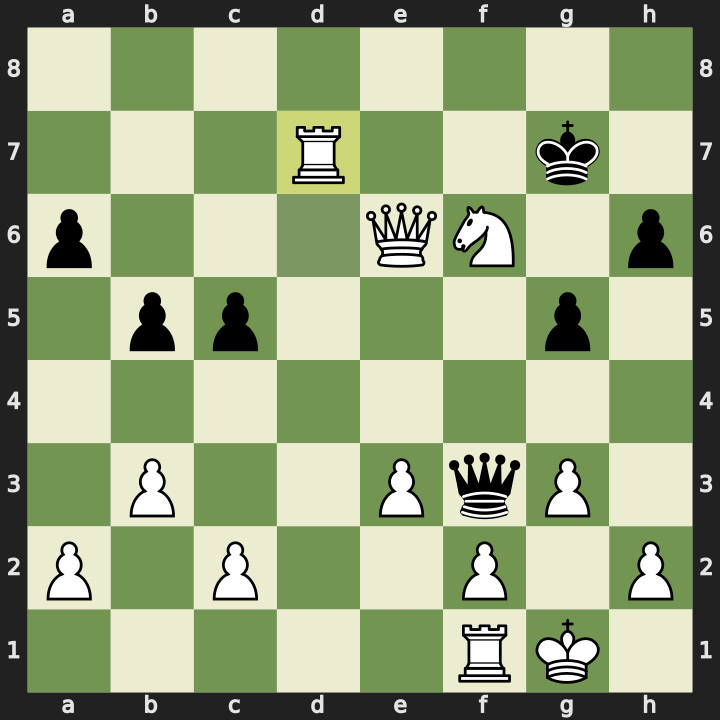
Simplification (Moves 16-30)
16. dxe5 fxe5 17. Bg5 h6 18. Bxe7 Qxe7 19. Rxf8+ Qxf8
Black’s king was not very well protected. I was about to exchange rooks, leaving the king off to the side by itself. I noticed I could check it with my light-squared bishop any time, so the plan was just trade everything and then I’d be up a piece, winning by promoting a pawn.
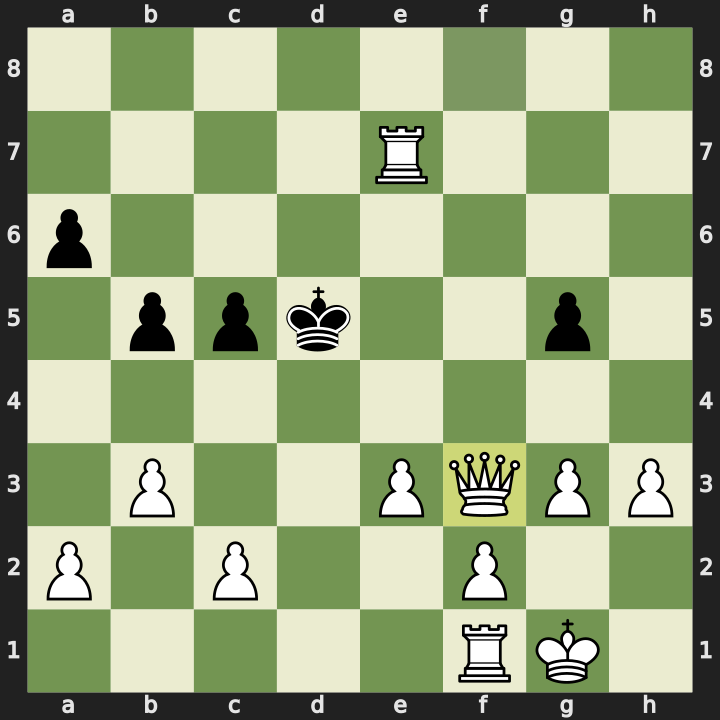
20. Qf1 Bd6 21. Qxf8+ Bxf8 22. Rf1 Bd7 23. Bc4+ Kh7 24. Nf5 Bxf5 25. exf5 Bc5+ 26. Kh1 Be3 27. Re1 b5 28. Bd3 Bd2 29. Rd1 Be3 30. f6+ Kg8
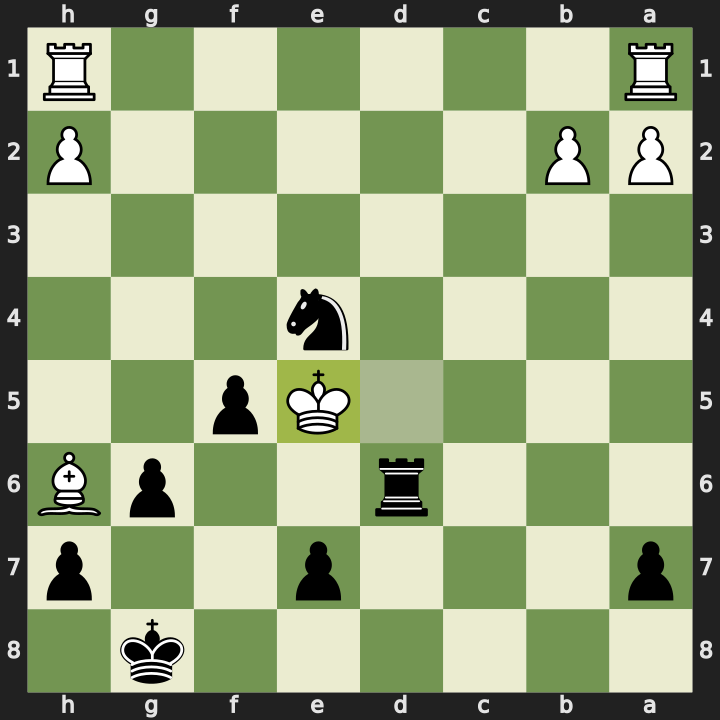
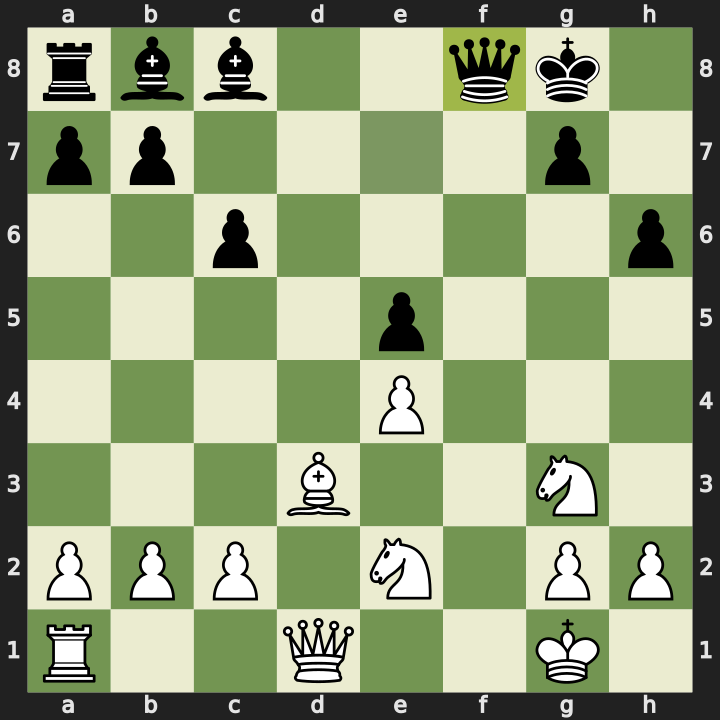
Promotion and Checkmate (Moves 31-43)
31. Rf1 g6 32. Bxg6 a5 33. Ng3 a4 34. Nf5 Bd2 35. f7+ Kf8 36. Nxh6
I made a mistake taking the pawn on h6 with my knight on move 36. It’s not losing because I’m already up a piece and several pawns, but it was unnecessary. There was a better move: I could have played Rf2 threatening the bishop, for example.
36…Bxh6 37. Rf6 Rd8 38. g4 Bg5 39. Rxc6 Rd2 40. Rc8+ Ke7 41. f8=Q+
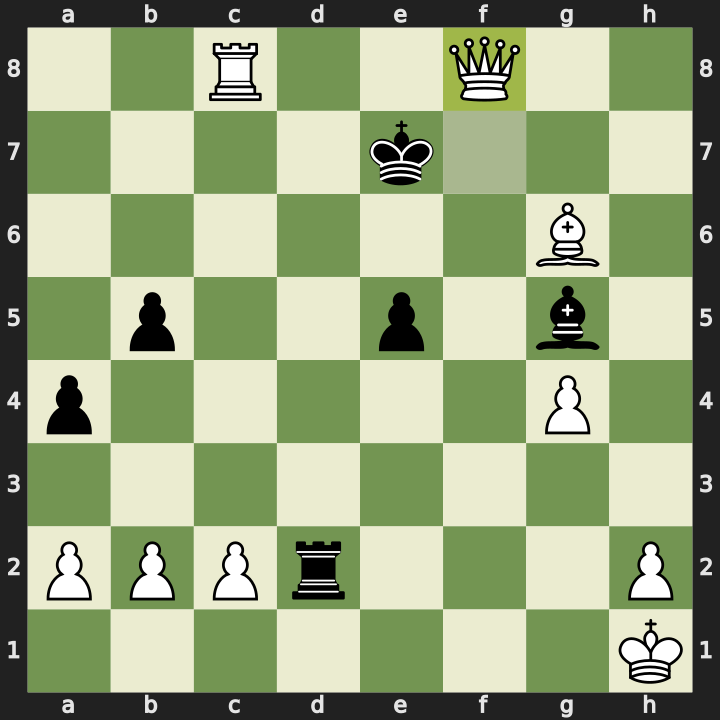
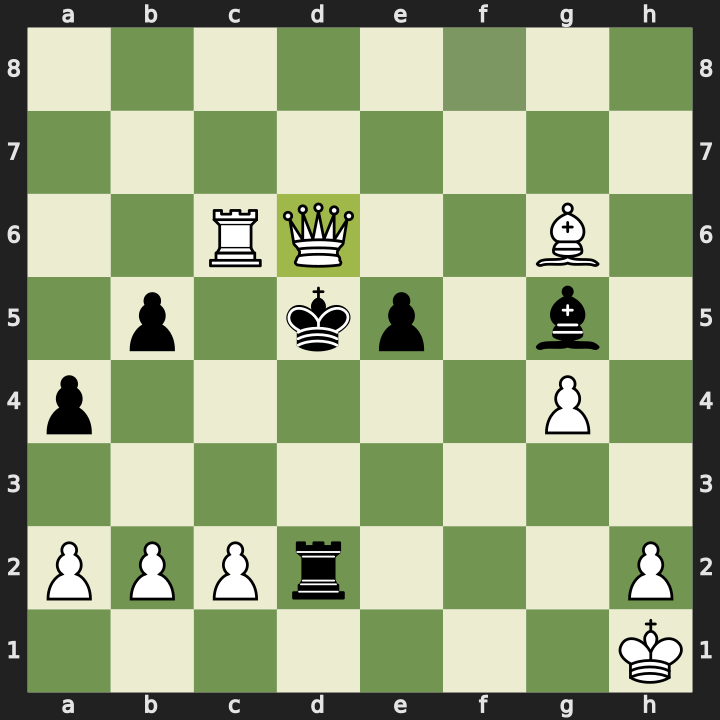
I saw a chance to promote my pawn by checking on c8, forcing the king off the back rank, allowing my pawn to promote. My new queen was protected by my rook.
41…Ke6 42. Rc6+ Kd5 43. Qd6#
Engine Review (Game 3)
The engine scores me at 80.2% accuracy and my opponent at 74.1%. I’m really happy to see that according to the engine there were no blunders, misses, or mistakes. I would have rated that knight move where I exchanged a knight for a pawn a mistake, but it didn’t cost me the game. I was already completely winning at that stage.
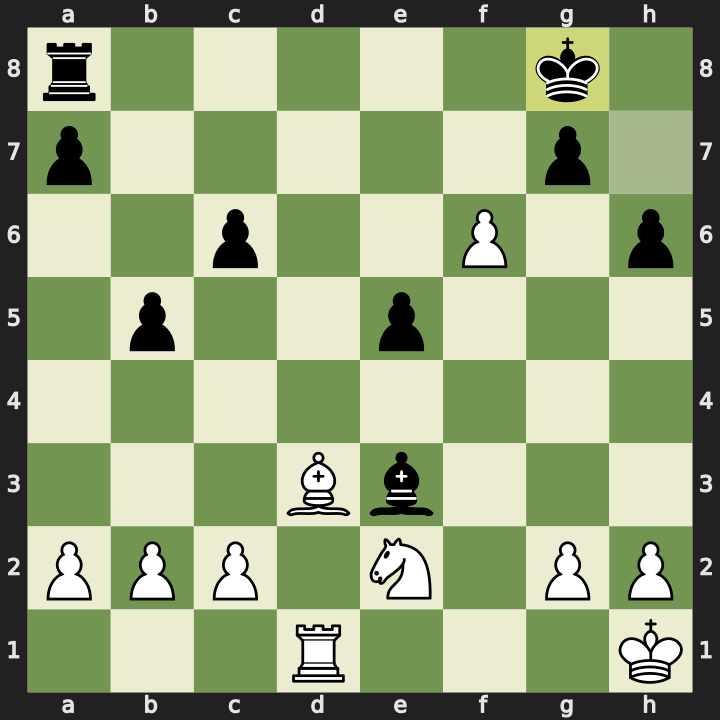
The engine agrees with my assessment that by giving up the centre, Black seriously weakened their position. There’s a +3 advantage to White even though I’m only up one pawn. Nxh6 was an inaccuracy, dropping the advantage from +5 to +3.6.
Black was pretty much already lost, but they had a chance to stay in the game a bit longer if they had blocked my check on the back rank with their bishop. If they move the king, it’s mate in three or mate in six.
Reflections
What went well:
- Recognising my opponent’s play style (lots of pawn moves, neglecting development) and exploiting the weaknesses it created.
- Staying patient and simplifying when ahead in material rather than trying to attack with everything.
- Solid openings across all three games. Taking the centre, developing pieces, and castling the king before going on the attack.
What to work on:
- The blunder in game 2 where I allowed a knight fork of my rooks. I need to always check for knight forks when a knight lands on a strong square. Pushing c6 to kick it was the obvious move.
- Look for tactical shots in worse positions, like the missed Nf2-Nd3# checkmate pattern in game 2.
- Don’t take unnecessary captures (like Nxh6 in game 3) when there are better moves available.
Full PGNs:
Game 1:
1. d4 d6 2. Nf3 c5 3. b3 b6 4. e3 f6 5. Bd3 e5 6. Bb2 Nc6 7. Bb5 Bb7 8. d5 a6 9.
dxc6 Bxc6 10. Bxc6+ Ke7 11. Bxa8 Qxa8 12. O-O e4 13. Nh4 g6 14. g3 f5 15. Bxh8
g5 16. Nxf5+ Ke6 17. Qg4 Nf6 18. Bxf6 Kxf6 19. Nc3 h6 20. Nxe4+ Kg6 21. Ne7+
Bxe7 22. Qe6+ Bf6 23. Nxf6 Kg7 24. Rad1 Qf3 25. Rxd6 b5 26. Rd7+ Kg6 27. Ng4+
Kh5 28. Qxh6+ Kxg4 29. h3+ Kf5 30. Qf8+ Ke4 31. Re7+ Kd5 32. Qxf3+ Kd6 33. Qf6+
Kd5 34. Rd1# 1-0
Game 2:
1. e4 d6 2. d4 Nf6 3. c3 g6 4. e5 dxe5 5. dxe5 Qxd1+ 6. Kxd1 Ng4 7. f3 Nxe5 8.
Nh3 Bg7 9. Nf4 O-O 10. Nd2 Nbc6 11. Ne4 Bf5 12. g4 Bxe4 13. fxe4 Nxg4 14. Ke1
Nce5 15. Nd5 Rfe8 16. Nxc7 Rac8 17. Nxe8 Rxe8 18. Bb5 Nc6 19. Bxc6 bxc6 20. Ke2
Bd4 21. cxd4 Nf6 22. e5 Ne4 23. Bh6 Rd8 24. Ke3 f5 25. e6 Rd6 26. d5 cxd5 27.
Kd4 Rxe6 28. Kxd5 Rd6+ 29. Ke5 g5 30. Kxf5 Rxh6 31. Kxe4 Kf7 32. Rhf1+ Kg6 33.
Rac1 Kh5 34. h3 Re6+ 35. Kf5 Rf6+ 36. Ke5 Rxf1 37. Rxf1 Kg6 38. a4 h5 39. Rg1 g4
40. h4 Kf7 41. b4 e6 42. b5 Ke7 43. a5 Kd7 44. Rc1 g3 45. b6 g2 46. bxa7 g1=Q
47. Rxg1 Kc7 48. a8=Q 1-0
Game 3:
1. d4 c6 2. Nf3 f6 3. e3 e5 4. Be2 e4 5. Nfd2 d5 6. O-O Nd7 7. Nc3 Bd6 8. f3 Bb8
9. fxe4 dxe4 10. Ndxe4 Qc7 11. Ng3 Nf8 12. e4 Ng6 13. Bd3 N8e7 14. Nce2 O-O 15.
Bf4 Ne5 16. dxe5 fxe5 17. Bg5 h6 18. Bxe7 Qxe7 19. Rxf8+ Qxf8 20. Qf1 Bd6 21.
Qxf8+ Bxf8 22. Rf1 Bd7 23. Bc4+ Kh7 24. Nf5 Bxf5 25. exf5 Bc5+ 26. Kh1 Be3 27.
Re1 b5 28. Bd3 Bd2 29. Rd1 Be3 30. f6+ Kg8 31. Rf1 g6 32. Bxg6 a5 33. Ng3 a4 34.
Nf5 Bd2 35. f7+ Kf8 36. Nxh6 Bxh6 37. Rf6 Rd8 38. g4 Bg5 39. Rxc6 Rd2 40. Rc8+
Ke7 41. f8=Q+ Ke6 42. Rc6+ Kd5 43. Qd6# 1-0