Win vs rob8theQueen (728)
| Opening: Colle-Zukertort (D02) | Result: 1-0 (Checkmate) | Time Control: Daily (1 day/move) | Rated |
Game Overview
This was a really exciting game. I’m starting to really enjoy the daily game format. It lets me consider each position like it’s a puzzle and try to make the best move. I went for a kingside attack which got a knight into an annoying position. It never quite led to the early checkmate I was hoping for, but it did serve me well, forcing Black to defend. There were chances for Black to win. Ultimately I’d say this game was determined by one mistake from my opponent, a pawn push of all things. I’m looking forward to analysing this one and seeing what we can learn.
The Colle-Zukertort Setup (Moves 1-12)
1. d4 e6 2. Nf3 d5 3. e3 Be7 4. Bd3 Nf6 5. Nbd2 O-O 6. b3 Nc6 7. a3 a5 8. Bb2 Bd6 9. Ne5 Bxe5 10. dxe5 Ng4 11. h3 Nh6 12. O-O
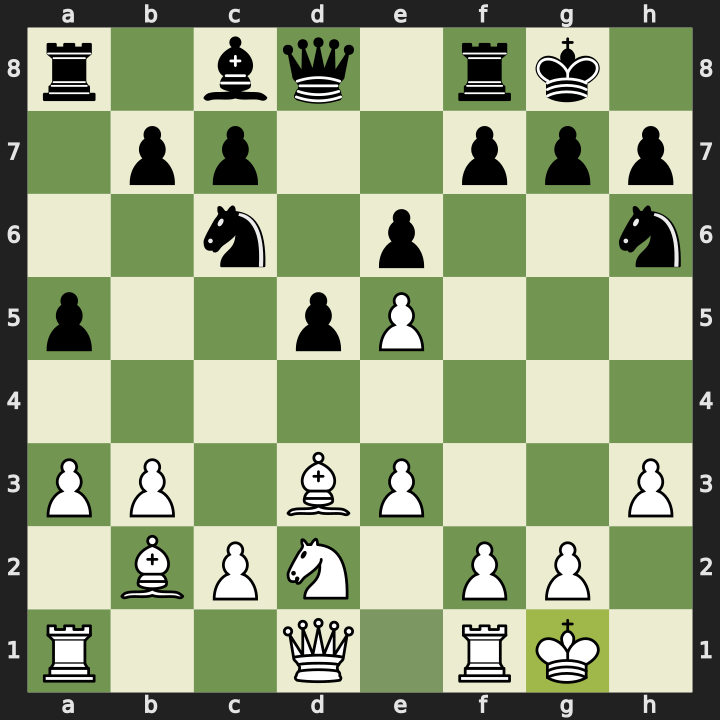
Pretty textbook. By move 12 I’ve got my pieces developed, king castled, and I’ve exchanged one knight for Black’s dark-squared bishop. I’m pretty happy about this. I’m ready to attack and there’s no annoying pieces on my half of the board.
The Kingside Attack (Moves 13-20)
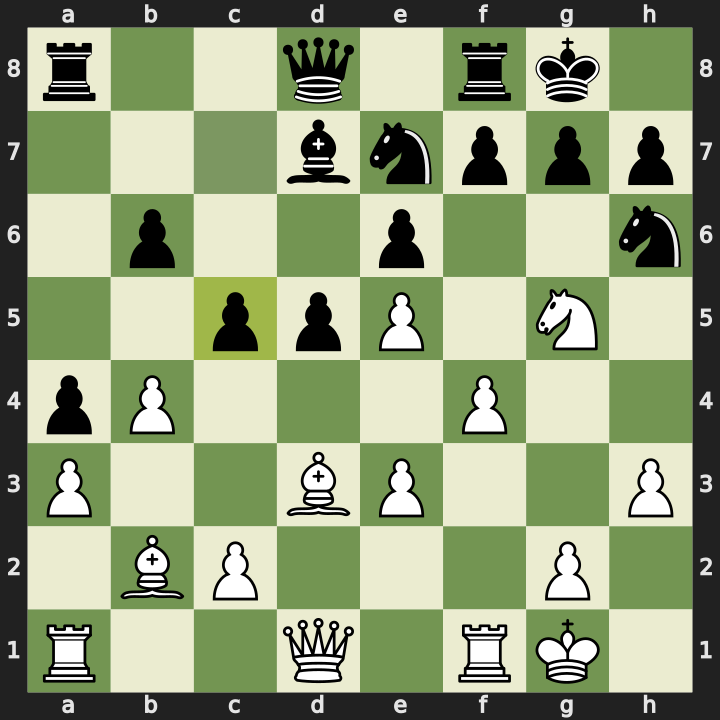
13. f4 Bd7 14. Nf3 a4 15. b4 Ne7 16. Ng5 c5
Black pushes their a-pawn and by the time it gets to the fourth rank I push b4, locking it into place. I push my f-pawn and get ready to use the thematic rook lift on the f-file, or perhaps bring the queen over on the d1-h5 diagonal.
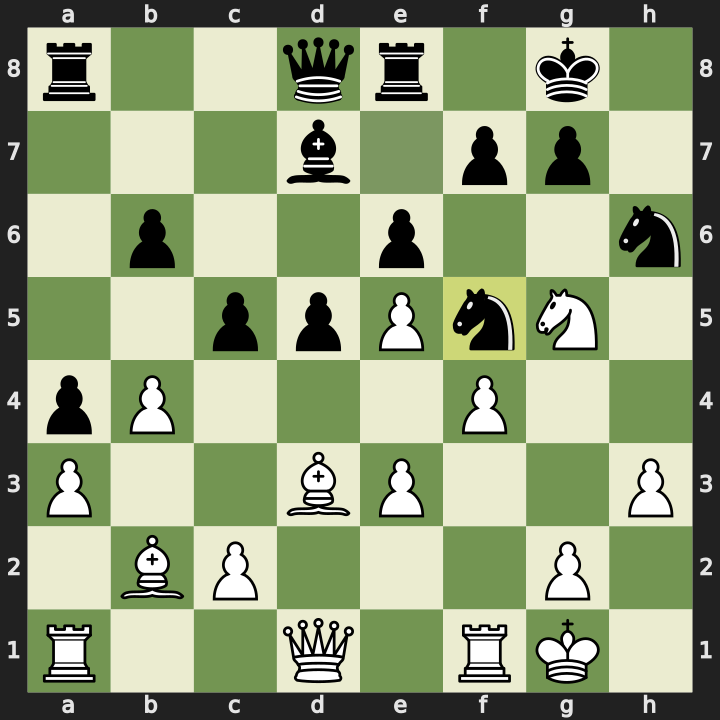
17. Nxh7 Re8 18. Ng5 Nef5
I grab the pawn on h7. My knight is supported by my bishop still on d3 from the opening. At this point I’m wondering if I can move my knight to f6 next turn, sacrificing it in exchange for the other pawn in front of the king. That would leave the king looking pretty weak.
Black made a good move making space for their king on the f-file, and I ended up not going for a knight sacrifice on f6. I think the knight on h6 means I can’t bring my queen in to g4 and there isn’t a good follow-up even if the king is exposed. So I play it safe and drop my knight back to g5.
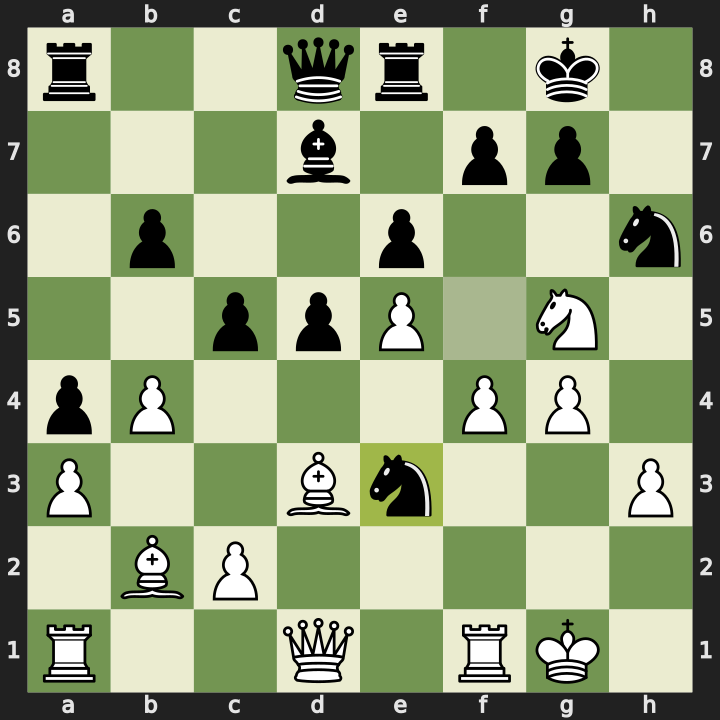
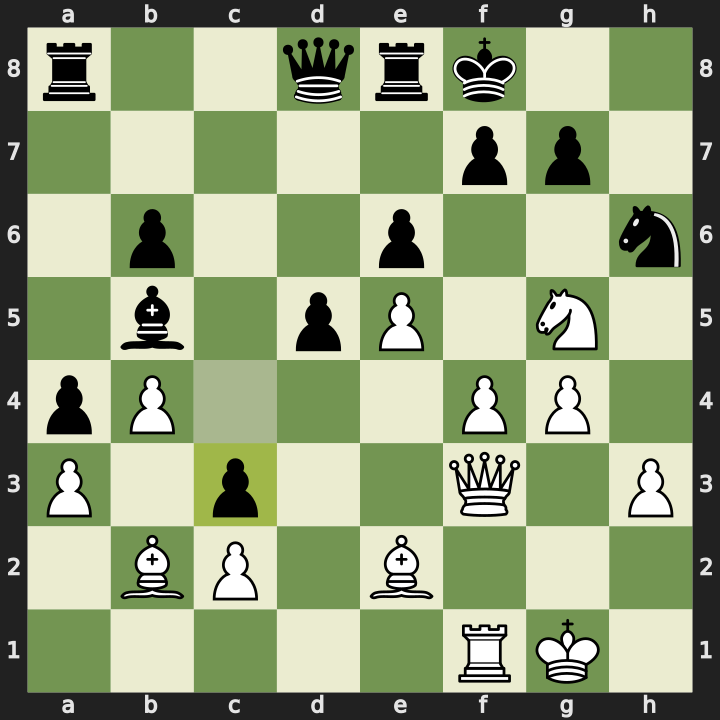
19. g4 Nxe3
Black hops their knight forward to f5, opening up a diagonal for the queen which is now pointed at my knight. I need to get more of my pieces closer to the king. I’ve got those two bishops and queen pointed in that general direction, but there’s too many pieces blocking the way.
I go for a pawn push to try and clear a path. It’s always risky pushing the pawns in front of the king. I’ve now pushed both f and g. However, as soon as I make this move I realise I’ve actually allowed Black’s knight into e3, forking my queen and rook. I think I’m about to be down an exchange.
20. Bh7+
Black does indeed go knight to e3. However, that vacates the square that was blocking my bishop from attacking the king. So I throw in Bh7+ just to be as annoying as possible before I have to give up my rook. Black moves the king and I get my queen out of danger from the knight. The knight’s going to take my rook on f1, but I can take back with my rook that’s currently very inactive on a1 and focus my attention on the kingside.
Fighting for the Centre (Moves 21-32)
21. Qf3 Nxf1 22. Rxf1 Bb5 23. Bd3 c4 24. Be2 c3
Black brings the bishop into b5 attacking my rook. I really like my rook on the f-file where it is because it’s lined up with the king. In the last lesson I had with my coach we focused on x-ray attacks for long-range pieces like rooks, bishops, and queens, so I think it’s important to keep that rook and queen battery on the f-file. I bring my bishop into d3 to block the attack on my rook, offering an exchange of bishops.
Black plays a really smart move: rather than exchanging bishops, they push their c-pawn to attack my bishop. I have to drop back to e2. This is a little bit double-edged from Black because now their pawn is pinned, since their bishop on b5 has no defence. Black pushes the pawn forward again to c3. Things are getting tense.
25. Bxb5 cxb2 26. Bxe8 Qxe8 27. Rb1 Qc8 28. Rxb2 f6
The bishops are staring at each other and my other bishop has a pawn attacking it. However, I notice that if I take Black’s bishop on b5 then I’ll also be lined up against their rook on e8. I could recover the material I lost in the earlier exchange to equalise the material position.
I take on b5, Black takes on b2 sacrificing the rook. That pawn on b2 is a bit lonely, but it is threatening to promote at some point. Black’s plan at this stage might be to set up a queen and rook battery on the c-file, promoting on b1 and taking out my pieces.
I bring my rook to b1, preventing any risk of promotion. This does essentially ruin my rook’s activity, but I can’t risk Black getting a second queen. Black brings their queen to the c-file, eyeing my pawn, threatening to come in and attack. I take on b2, eliminating the risk of a second queen. My rook has very little activity now.
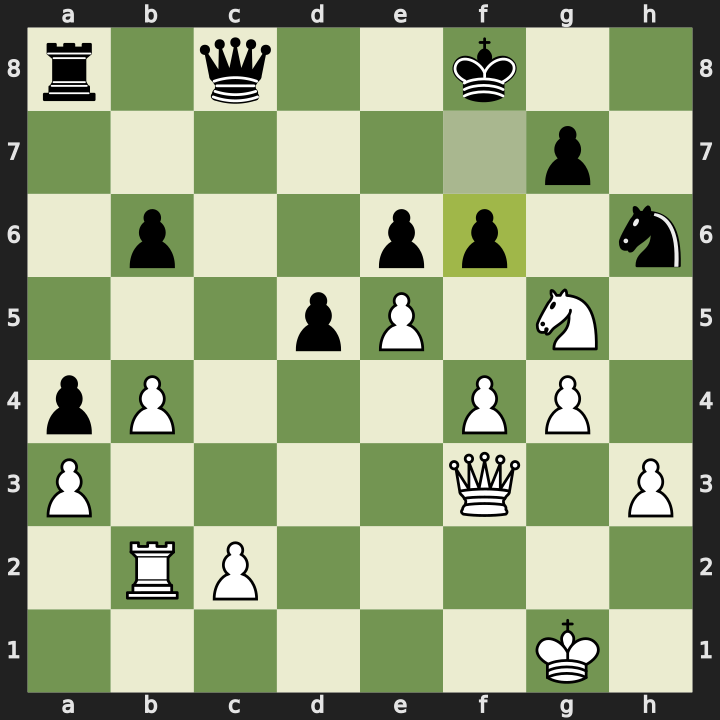
29. Nh7+ Kg8 30. Qd3 f5 31. g5 Nf7 32. g6
Black kicks my knight on g5 and I hop it to h7+. The king retreats and I play Qd3, supporting my knight and guarding c2. Black pushes f5, I counter with g5 hitting the knight. Black hops the knight away, allowing me to push further with g6, supporting my own knight and attacking theirs. The g-file in front of my king is looking pretty clear, but Black’s pieces are all over on the queenside. There’s no escape for Black’s king: it can’t get out via the f-file thanks to the pawn and knight, so if I can attack through the back rank then I might have a chance.
The Race (Moves 33-39)
33. b5 Qe8 34. Qg3 d4 35. Rb4 Rc8 36. Qg2 Qe7
I need to clear the way for my rook to get some activity on the c-file, so I push b5 with the plan to keep Black’s b-pawn where it is on b6 and then eventually go c4. Black’s queen threatens my pawn, which I need to protect to keep my knight safe, so I defend it with my queen.
Black pushes d4. I realise I don’t have time to push my c-pawn, so I go Rb4, double-attacking the pawns on a4 and d4. Black attacks my isolated pawn on c2 by going Rc8. I can’t afford to let Black’s pieces onto the second rank. I drop my queen back to g2 to defend.
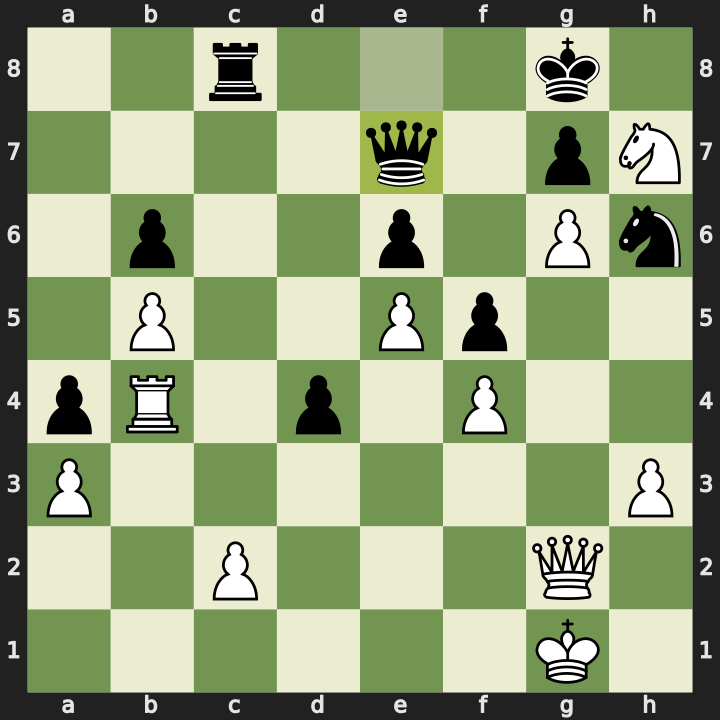
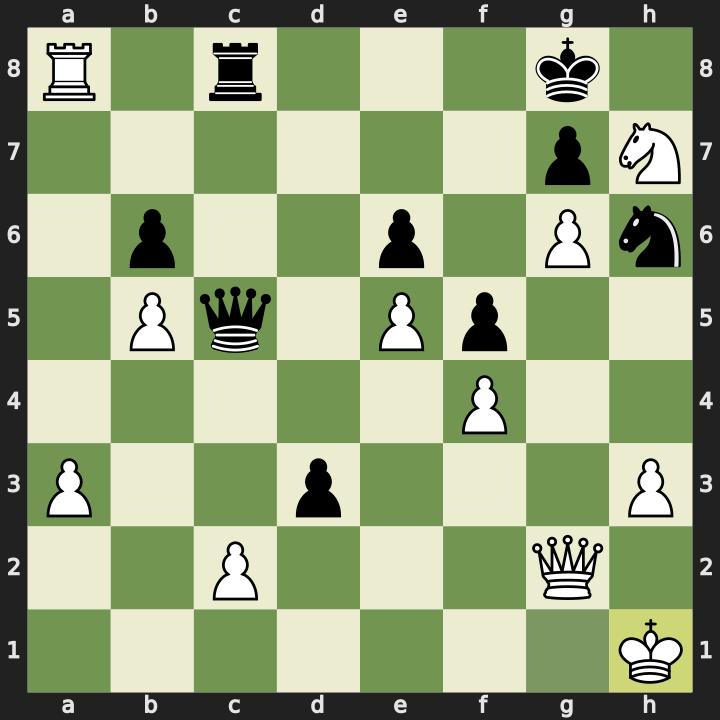
37. Rxa4 Qc5 38. Ra8
Black goes Qe7 targeting my rook on b4. I spot a tactic: Rxa4, then if Black’s rook takes on c2, I go Ra8+ forcing Black to bring pieces back to block the check. If Black doesn’t spot the tactic, it’ll be mate in three.
Black brings the queen into c5, threatening to take on c2 and trade queens. I’m actually okay with this because it will still lead to the checkmate idea I have. I go Ra8, hoping Black will take my rook on a8 and I’ll be able to take back with the queen, which also leads to checkmate.
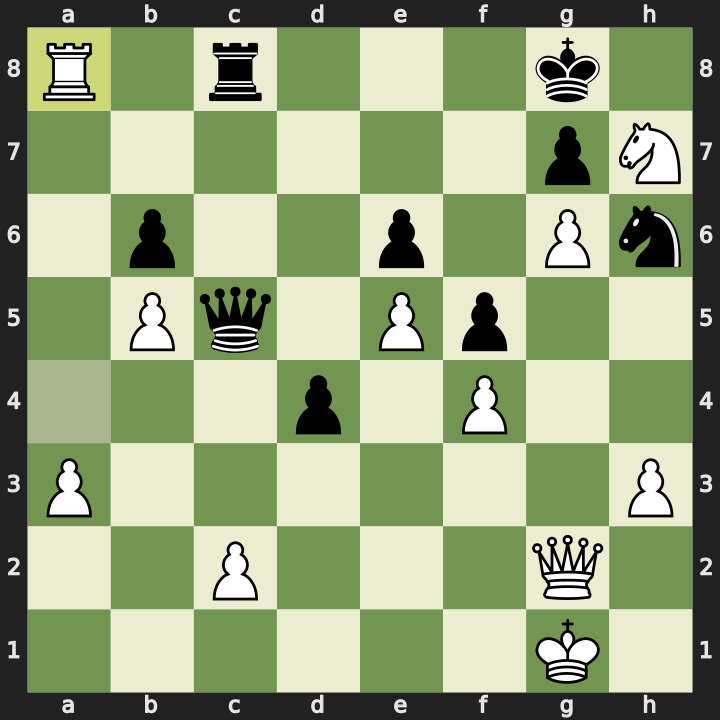
38…d3+ 39. Kh1
Fortunately for Black, that’s not how it worked out. Black had a discovered check waiting and pushes d3+. I move my king to h1 to get out of danger.
39…d2
This is a critical moment in the game. Black has a number of moves they can make. They could take on c2 with the queen, they could take on c2 with the pawn, and they are totally winning if they make the right move. However, luck is on my side today and Black plays d2. I wonder if this was a mouse slip. Pushing d2 allows me to take with the queen and the chance of promoting that pawn is gone.
The Finish (Moves 40-46)
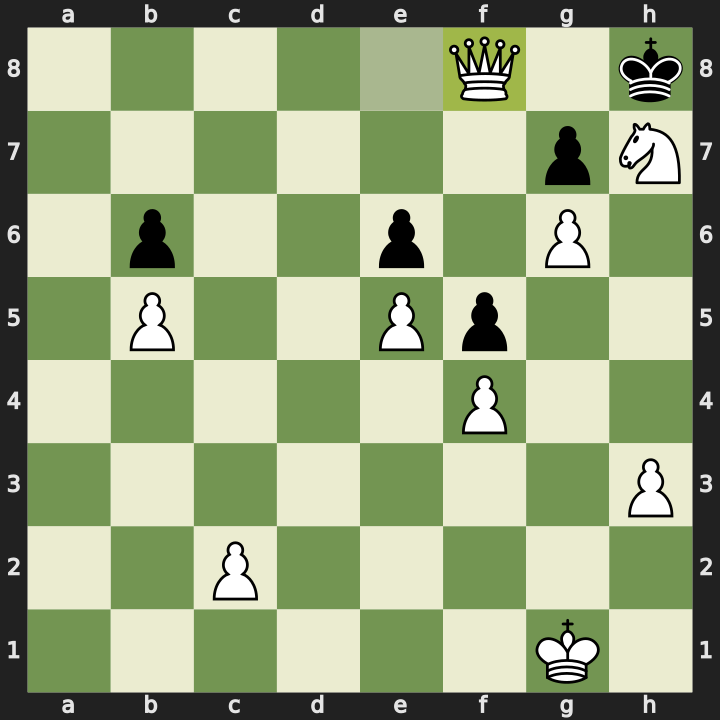
40. Rxc8+ Qxc8 41. Qxd2 Qa8+ 42. Kg1 Nf7 43. Qd7 Qxa3 44. Qxf7+ Kh8 45. Qe8+ Qf8 46. Qxf8#
First I need to neutralise the battery. I take on c8 with my rook, check. Queen takes c8, then I grab the pawn on d2. I’m technically three points of material up in this position, so there’s a good chance I can promote one of my pawns on the a, b, or c files, as long as I can keep Black’s queen away from my king and shepherd the pawns up. That’s my new plan after having to give up my rook.
Black checks on a8, I move my king. They try and get their knight to a better square with Nf7, offering to trade their knight for my knight and allowing me to bring my pawn to f7. However I can see that my knight and pawn are doing a fantastic job at locking the king in place, so I have no intention of taking with the pawn.
I bring my queen up to d7. Black will be in serious trouble if I can take the knight on f7 with my queen. Black attacks on a3 with their queen. I have to be careful, it’s protecting e7 and f8 from where it is. But I can grab Black’s knight on f7. The king is pushed into the corner and with Qe8+, Black is forced to block the check with their own queen, and Qxf8 is checkmate.
What a finish. The queen stayed on the board till the very end. The knight that I initially attacked with remained annoying all the way through the game. I used my king’s pawns to attack, leaving my king open and exposed, and Black had some very close chances to promoting pawns. This was honestly one of the most exciting chess games I’ve played.
Engine Review
Neither of us played very accurately: 73.5% accuracy for me and 62.9% accuracy for my opponent. One blunder, one miss, and three mistakes for me. One blunder, three misses, and two mistakes for my opponent. Game rating: 1100 for me, 600 for my opponent.
On move 10, my opponent played 10…Ng4, completely hanging the knight. It was just a free piece: I could’ve taken with Qxg4. I totally missed that the knight wasn’t supported by the bishop on c8 because of the pawn on e6.
The engine likes my 17. Nxh7, with Re8 being the correct response from Black. Playing it safe with 18. Ng5 is the best move according to the engine. I remember why I played it: I saw that after sacrificing my knight on f6, the king is exposed, but my bishop on d3 gets attacked with c4. The other idea I had was to bring the bishop up to h7 checking the king. I’m glad I played the right move there and wasn’t too eager to sacrifice the knight.
19. g4 was a mistake, allowing Black to fork the queen and rook. I should’ve seen that.
After losing the exchange, the position is dead equal according to the engine.
By move 36, the engine gives White a 3.6 advantage even though I’m only up a pawn. However, 37. Rxa4 is a mistake, wiping out the advantage down to 0.6. If Black plays the right moves, they can bring their queen down through my kingside, pick up some pawns, and have a pretty threatening battery with the rook on the c-file.
38. Ra8, the move I thought was a clever tactic, is a blunder thanks to the discovered check and the opportunity to promote the pawn with correct play.
However, White is back in a winning position after Black pushes the pawn to d2 and White plays 40. Rxc8+: a four-point advantage.
Black’s final mistake was taking the pawn on a3. They’re still completely losing, but they could’ve stayed in the game a little longer by pushing the king into the corner so that Qxf7 wouldn’t come with check. In that case I would’ve had to exchange queens and then promote a pawn to get the final win.
It’s amazing how the evaluation swung from +5.4 on move 10 when Black left a piece hanging, to -5.4 when Black had a chance to promote their pawn on move 39. This game really highlights that it’s never too late to lose a chess game, and games are often won or lost due to mistakes rather than genius strategy and tactics.
Reflections
It was a bit disappointing that my kingside attack didn’t lead to checkmate, but I was happy that I was able to cement a knight in an annoying position which eventually contributed to the mate.
What went well:
- Using the daily format to really think through each move. Treating every position like a puzzle.
- The knight on h7 supported by the g6 pawn was a constant thorn. It locked the king in and contributed to the final checkmate.
- Recovering material after the exchange loss. Taking on b5 left the bishop lined up against the rook on e8.
What to work on:
- I need to be wary about locking up the queenside before focusing too much on my own attacks. There were two very close calls in this game where Black, had they supported their pawns more accurately, could’ve promoted and won.
- Missing free pieces. The knight on g4 on move 10 was just hanging and I didn’t see it.
- Calculating discovered checks. The d3+ discovery blew up my back rank tactic completely.
Full PGN:
1. d4 e6 2. Nf3 d5 3. e3 Be7 4. Bd3 Nf6 5. Nbd2 O-O 6. b3 Nc6 7. a3 a5 8. Bb2
Bd6 9. Ne5 Bxe5 10. dxe5 Ng4 11. h3 Nh6 12. O-O b6 13. f4 Bd7 14. Nf3 a4 15. b4
Ne7 16. Ng5 c5 17. Nxh7 Re8 18. Ng5 Nef5 19. g4 Nxe3 20. Bh7+ Kf8 21. Qf3 Nxf1
22. Rxf1 Bb5 23. Bd3 c4 24. Be2 c3 25. Bxb5 cxb2 26. Bxe8 Qxe8 27. Rb1 Qc8 28.
Rxb2 f6 29. Nh7+ Kg8 30. Qd3 f5 31. g5 Nf7 32. g6 Nh6 33. b5 Qe8 34. Qg3 d4 35.
Rb4 Rc8 36. Qg2 Qe7 37. Rxa4 Qc5 38. Ra8 d3+ 39. Kh1 d2 40. Rxc8+ Qxc8 41. Qxd2
Qa8+ 42. Kg1 Nf7 43. Qd7 Qxa3 44. Qxf7+ Kh8 45. Qe8+ Qf8 46. Qxf8# 1-0