Win vs leofriz (1114)
| Opening: Jobava London (A45) vs Pirc Defence | Result: 0-1 (Checkmate) | Time Control: 1 day/move (Daily) | Rated |
Game Overview
This was a daily game against an 1100-rated opponent and I’m really excited to talk about it. Some really sharp, tricky positions came up, but I was able to defend and attack using a combination of positional play and tactics to deliver checkmate. I’ve been doing well with daily games and I’m already up to a 1200 daily rating, with a goal to get my rapid rating up to about 1000. This game in particular felt like playing puzzles: if you look hard enough you can find advantages by evaluating all the candidate moves, the best response from the opponent, and looking down the line to see where they lead.
The Opening (Moves 1-6)
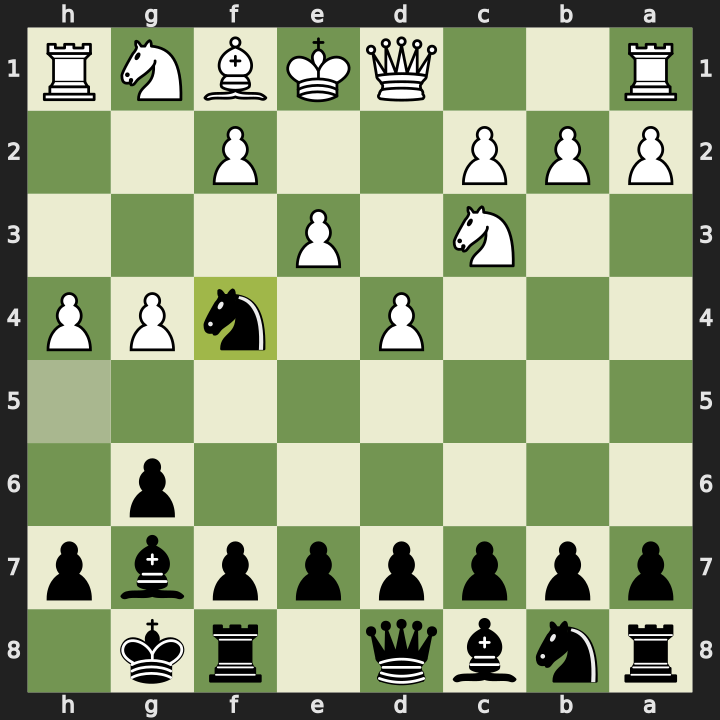
1. d4 Nf6 2. Nc3 g6 3. Bf4 Bg7 4. e3 O-O 5. h4
White opens with what looks like a Jobava London system with Nc3 and Bf4, a strong opening that can lead to some traps particularly if the knight can get to c7. I responded with my typical Pirc Defence setup and then saw an opportunity to attack the dark-squared bishop with my knight.

5…Nh5 is a trade that I’m always happy to make. Eliminating my opponent’s dark-squared bishop makes my king quite a bit safer for the remainder of the game because it’s the bishop that defends against a kingside attack. That’s exactly what happens on move 6: White plays g4 and I take the bishop on f4.
6. g4 Nxf4
The Questionable f5 Push (Moves 7-9)
Looking at the position, there’s a pawn storm coming at my king. Three pawns are already on the fourth rank on the h, g, and f files and I should probably do something about them before they steamroll into my position. There was no e-pawn anymore, so pushing my d-pawn felt less urgent. I decided to try something a bit unusual.
7. exf4 f5
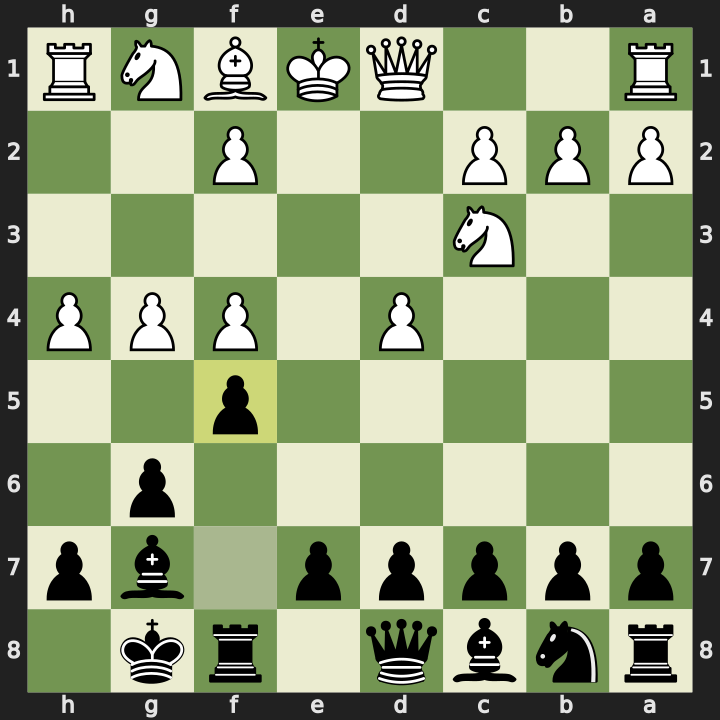
The f5 push is thematic in the King’s Indian Defence, but it should really only be played when the centre is locked. In this game the centre had started to open up with White giving up their e-pawn, so in hindsight I think it was a mistake to push f5 here. The engine prefers d5, which is more of a Grunfeld idea. I need to get more comfortable with that d5 push. I tend to play the Pirc or KID which generally involves d6 followed by either c5 or e5. d5 is really unfamiliar to me.
8. g5 Nc6 9. Nf3 b6
The engine flags b6 as a mistake because it invites d5, kicking my knight to the unideal a5 square. Luckily White never played d5 and I was able to move my knight before it became an issue.
Building the Position (Moves 10-13)
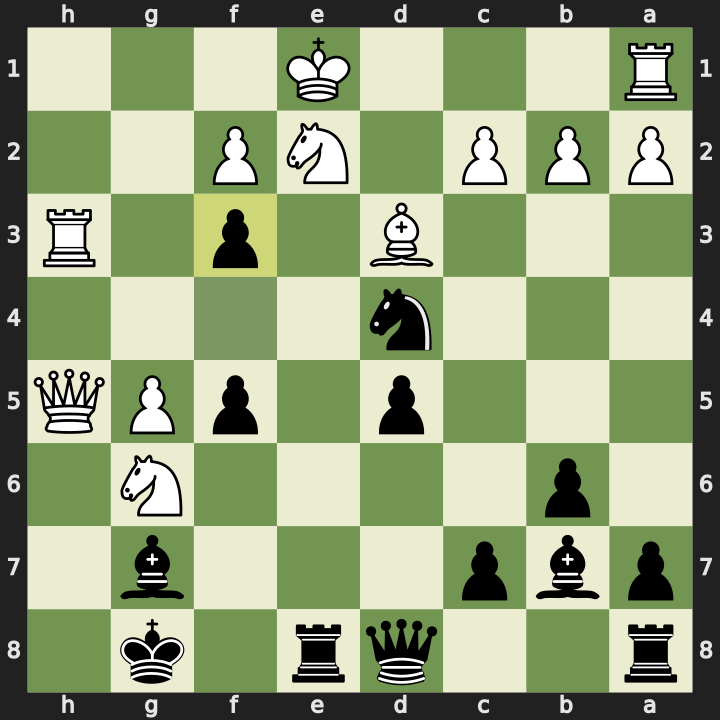
10. h5 Re8
Sliding the rook to e8 ended up being a very good decision. It kept my rook on the same file as White’s king. At the time it was primarily to deal with a potential h6 push: I needed a square for my bishop to retreat to and didn’t want my king boxed in between a bishop on h8 and a rook on f8. I also saw a chance to use a double fianchetto setup because White had already weakened the squares around their rook on h1. If I could get my bishop onto b7, it would be pointing at a knight that was pinned to the rook on h1.
11. hxg6 hxg6 12. Nh4 Bb7

White takes my pawn on g6, which I take back with my h-pawn, opening the h-file for White. White also moves their knight from f3 to h4. The engine actually prefers pinning my knight to the bishop with Bg2 here, but instead White checks on c4 with their light-squared bishop.
13. Bc4+ e6
I block with the e-pawn. White has also moved their knight away from the h1-a8 diagonal, so the next time I move my knight it’ll come with a discovered attack on the rook.
Knight Activation (Moves 14-16)
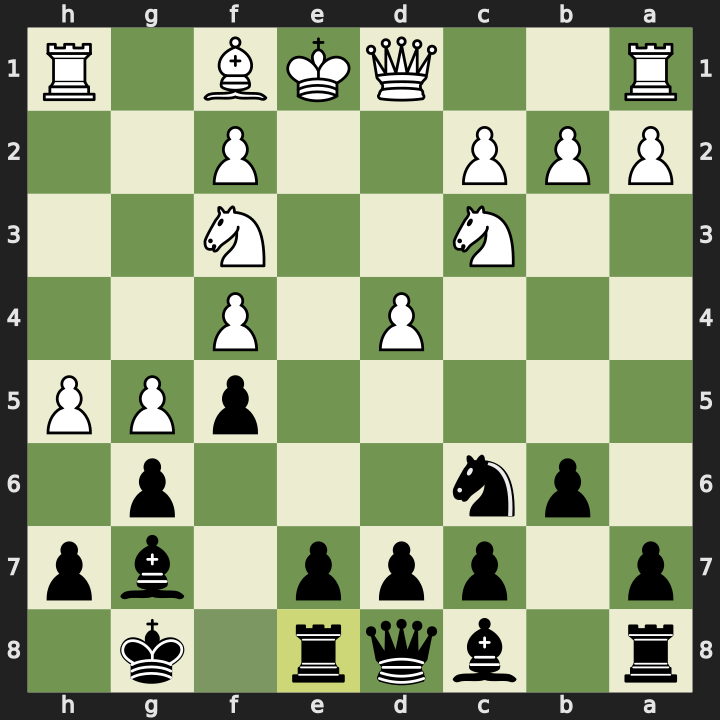
14. Nxg6 Nxd4

I activate my knight to the d4 square where it’s defended by my dark-squared bishop on g7, and unleash the discovered attack on White’s rook. White comes down to h3 with their rook and I try to keep up the initiative.
15. Rh3 d5 16. Bd3 e5
I push d5 attacking White’s bishop, then see an opportunity to take even more space in the centre with e5. If White decides to take on e5 with the pawn, I could take back with the bishop. If they take with the knight, I can recapture with the rook, checking the White king. White would be forced to either pin a piece on e2 or move the king, preventing castling. Since White still has a rook on a1 that can’t get into the game, preventing castling looked like a strong option.
The Tactical Storm (Moves 17-19)
White comes in with more pieces to attack. They had the knight, the rook, the queen, and bishop all pointing towards my king. But I had a check.
17. Qh5 exf4+
Taking on f4 opens up the e-file with my rook waiting to check the king from back on e8. White blocks the check with a knight on e2, but I can push the pawn that I’d just moved from the e-file to f4 one more square forward to put pressure on the now-pinned knight.
18. Ne2 f3
The engine actually prefers pushing e4 here instead, attacking the bishop on d3 directly. But I think in these kinds of positions where I’m technically in a worse evaluation, playing moves that are tricky for people is probably more important than playing the theoretical best engine line. My opponents aren’t going to be playing engine lines either. The Ne2 block was the mistake that really allowed me to get back into the game.
Defending Against Checkmate (Move 19)
19. Nh8 Qd7
White threatens checkmate with Nh8. If I hadn’t calculated properly, White could then play Qf7# and that would be game over. I looked at several options and found that Qd7 was the best way to defend.
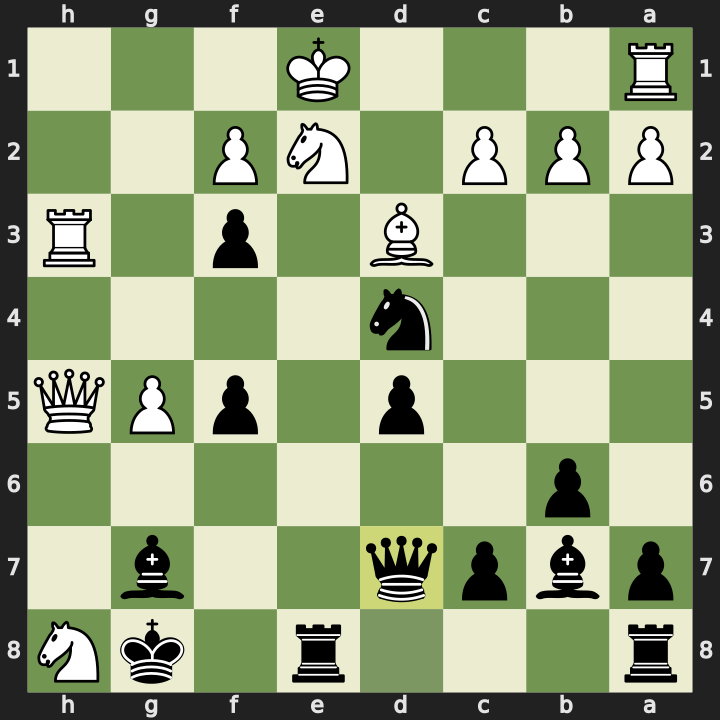
For example, if I had put a piece on e7 instead, White could play Qh7+ forcing my king to f8, and then Ng6+ double attacking my king and the piece I’d placed on e7. I was very happy to have carefully considered these lines and found Qd7.
The Critical Moment (Moves 20-24)
20. Qh7+ Kf8 21. Bxf5
White keeps building pressure with Qh7+ check. I slide my king over, and then White takes on f5 with their bishop, attacking my queen. This is the critical moment of the game. White’s Bxf5 was the blunder that swung the evaluation from +2.6 in White’s favour to -4.9 in Black’s favour.
I had one more trick up my sleeve: using the rook I’d placed on the e-file earlier to check the king, supported by both the pawn on f3 and the knight on d4. This would buy me enough time to manoeuvre my queen out of danger, and I was hoping White’s king would move to d1, effectively blocking their own rook on a1 for the rest of the game.
21…Rxe2+
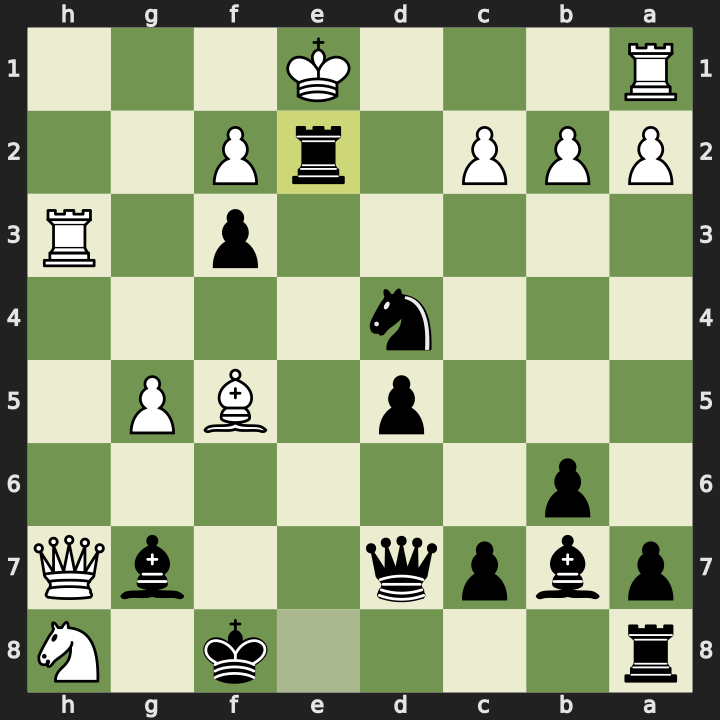
White did move the king to d1. The engine says they should have hid behind their pawn on f1 instead, which would have allowed the rook on a1 to get into the game at some point. That combination of a blunder followed by an inaccuracy completely swung the position into my favour.
I calculated several variations from here. Should I take the bishop with my knight? With my queen? Should I move my queen somewhere else? After looking at all the variations I found that Qxf5 looked the best because it invites a queen trade, and at this point I’m already up two pieces. The threat incoming was Rxf3 which would pin a piece on f5 to my king.
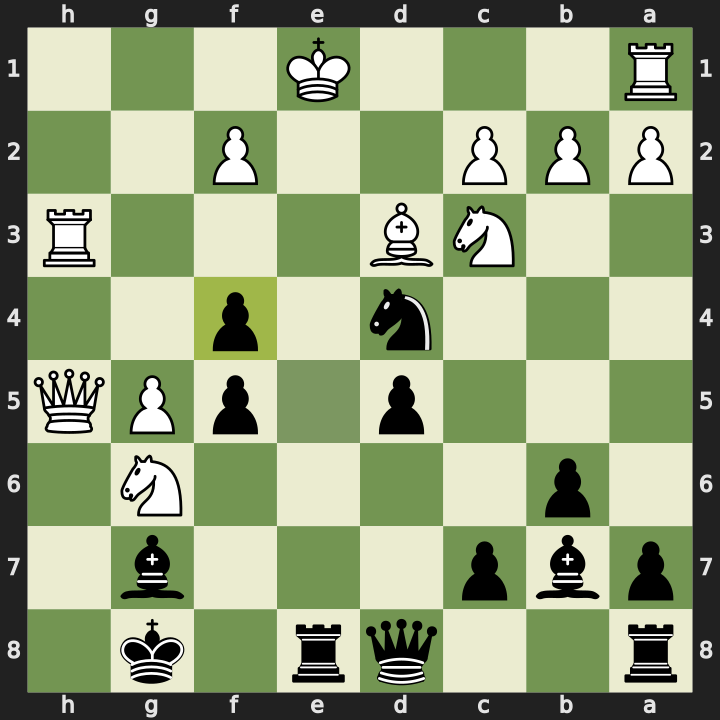
22. Kd1 Qxf5 23. Qxf5+ Nxf5 24. Rxf3 Ba6
White goes for the queen trade and I take back with the knight, allowing it to be pinned when the rook takes on f3. In this position there’s only one move I could find that saves it for Black, because most of the moves leave the rook on e2 undefended. After Rxf5+ the king could take the rook on e2, effectively equalising material. I didn’t want that, so I found Ba6.

Ba6 defends the rook on e2, which keeps the king trapped on d1, which in turn keeps White’s rook on a1 boxed in and unable to enter the game. While the evaluation says I’m up five points, I’m really up ten points because that rook is doing nothing. The engine says Ba6 isn’t strictly necessary and prefers going straight for Re8, since the rooks can protect each other on the e-file and checkmate still comes. But it served me well knowing my rook on e2 was protected and that the king couldn’t walk out of its boxed-in position.
The Checkmate (Moves 25-28)
25. Rxf5+ Kg8 26. Nf7 Rae8
I give back some material when the rook takes on f5 as expected, and I move my king over to g8 threatening White’s knight on h8. White relocates their knight to f7 and here I’m able to bring my second rook into the game on e8. I have two rooks on the same file and I can see a path to checkmate: if I can get my rooks to e1 and e2 with my bishop stopping the king from escaping, it’ll be mate.
27. Rc1 Re1+ 28. Kd2 R8e2#
White plays a pretty weak move with Rc1. I suspect they may have already given up because there’s a mate in two on the board. Re1+ is check, Kd2 is the only move, and R8e2# is checkmate.
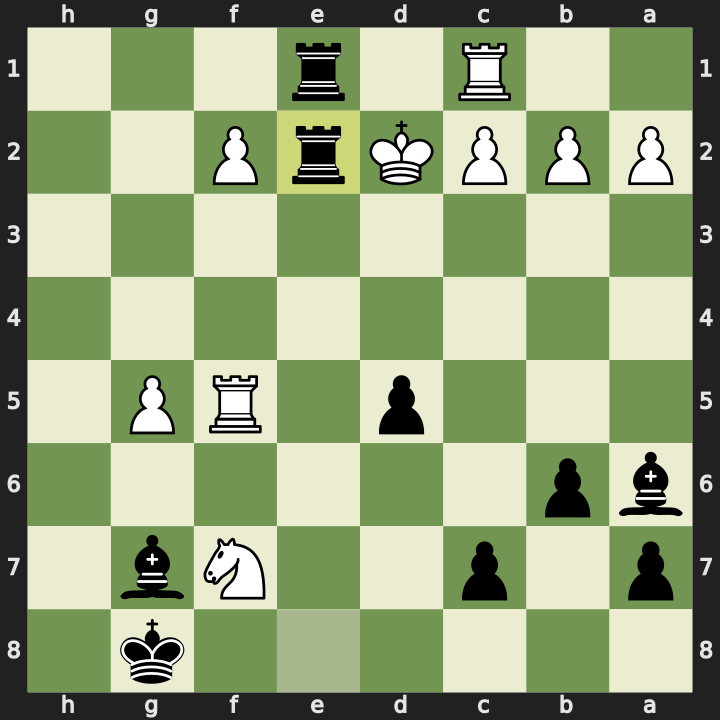
The engine says White could have kept the game alive by playing Nh6+ instead of Rc1. The best response is actually not to take the knight with the bishop but rather move the king to h7, then try to block the dark-squared bishop with Rf6. In those lines Black has to give up at least an exchange of pieces, which gives White’s king a small chance to get out and potentially bring the other rook in. It’s still winning for Black, but there was a try.
Engine Review

75.7% accuracy for me, 64.3% for my opponent. Game rating of 1250 for me and 600 for my opponent. No blunders for Black, one blunder for White, and each of us made three mistakes and missed one tactic.
The opening was fairly booked up until move 5, where my Nh5 was dubious. The engine preferred just pushing h5. However, White pushing g4 to allow the capture of the dark-squared bishop on f4 was a great result for Black, so sometimes a dubious move can pay off.
My f5 push lost the advantage, with the engine preferring d5. Then b6 was a mistake because it invited d5 kicking my knight. On move 12, the engine prefers moving the knight to d4 first rather than getting my bishop to b7. White also missed the Bg2 pin, instead going for the check on c4.
The engine considers my exf4+ check an inaccuracy, preferring to push the pawn one more square forward to attack the bishop on d3. And my Qd7 defence is also considered an inaccuracy: the engine prefers going straight for Rxe2+ check, giving two pieces for the rook if White takes back with their bishop. But had I not played Qd7, White may not have been quite so tempted to play their blunder move a couple of moves later.
The critical moment was move 21 where White played Bxf5. The evaluation swung from +2.6 in White’s favour to -4.9 in Black’s favour. Then Kd1 instead of Kf1 made things even worse. From there, Qxf5 inviting the queen trade was the best move. I took a long time figuring out whether that was the right way to go, and the next couple of moves were also best.
White’s final mistake was Rc1 with a mate in two on the board. They could have tried Nh6+ to keep the game going a bit longer.
Reflections
What went well:
- Eliminating the dark-squared bishop early to make my king safer.
- Placing the rook on e8 which turned out to be crucial for the entire middlegame and endgame.
- Careful defensive calculation to find Qd7 against the checkmate threat.
- Finding the Rxe2+ check to exploit the pinned knight and trap White’s king on d1.
- Identifying that Qxf5 was the best continuation after considering multiple variations.
- Using all the time available in the daily game format to really study candidate moves and their consequences. This game felt like playing puzzles and that approach paid off.
What to work on:
- Getting more comfortable with the d5 pawn push. It’s thematic for the Grunfeld but unfamiliar since I usually play the Pirc or KID with d6.
- Being aware of pawn moves that invite the opponent to kick my pieces, like b6 inviting d5.
Full PGN:
1. d4 Nf6 2. Nc3 g6 3. Bf4 Bg7 4. e3 O-O 5. h4 Nh5 6. g4 Nxf4 7. exf4 f5 8. g5
Nc6 9. Nf3 b6 10. h5 Re8 11. hxg6 hxg6 12. Nh4 Bb7 13. Bc4+ e6 14. Nxg6 Nxd4 15.
Rh3 d5 16. Bd3 e5 17. Qh5 exf4+ 18. Ne2 f3 19. Nh8 Qd7 20. Qh7+ Kf8 21. Bxf5
Rxe2+ 22. Kd1 Qxf5 23. Qxf5+ Nxf5 24. Rxf3 Ba6 25. Rxf5+ Kg8 26. Nf7 Rae8 27.
Rc1 Re1+ 28. Kd2 R8e2# 0-1