Win vs kiro74: One Square From Mate
| Opening: King’s Pawn Opening: King’s Knight, Gunderam Gambit | Result: 1-0 (Timeout) | Time Control: 10 min Rapid | Rated |
Game Overview
Chess.com calls this one the King’s Pawn Opening: King’s Knight, Gunderam Gambit. Not one I’m familiar with. I guess it’s characterised by the c6 push, which allows the queen to come out to b6 or a5.
I decided to play it like a Scotch Game, push d4 defended by the knight on f3. There was a brief moment of fear when Black played the bishop to h3 with their queen on g6, threatening checkmate in one. I traded queens, took a knight to e6, and won the d-pawn. Then it crumbled: a knight fork cost me a rook, and I made a losing bishop move on move 30. Black flagged before they could punish it.
The Opening and a Mate Threat (Moves 10-12)
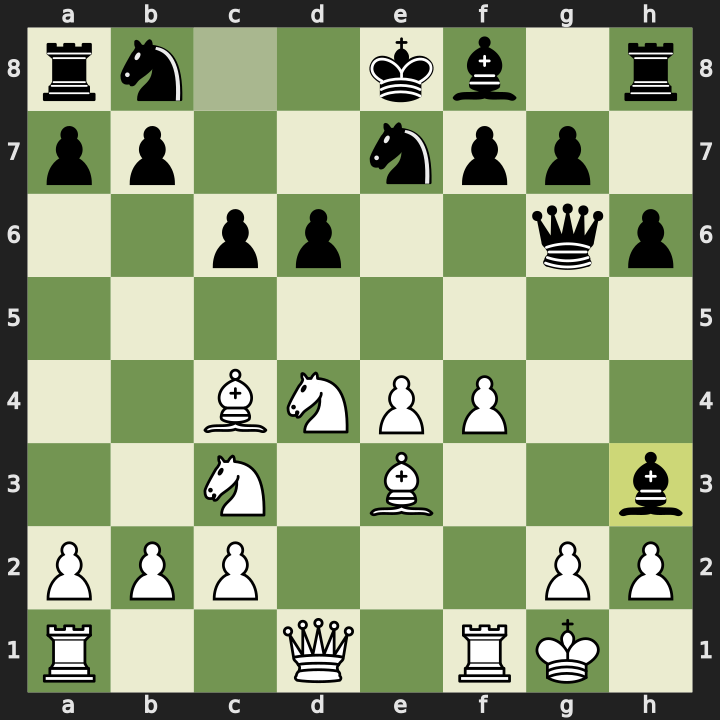
10.Qf3 Bg4 11.Qg3 h5 12.h3
There was a brief moment of fear here. 9…Bh3 threatens Qxg2, which is mate. Luckily I had left my queen on its starting square and was able to play 10.Qf3, guarding g2 and attacking the bishop on h3 at the same time, thwarting the checkmate threat.
The Queen Trade (Moves 12-14)
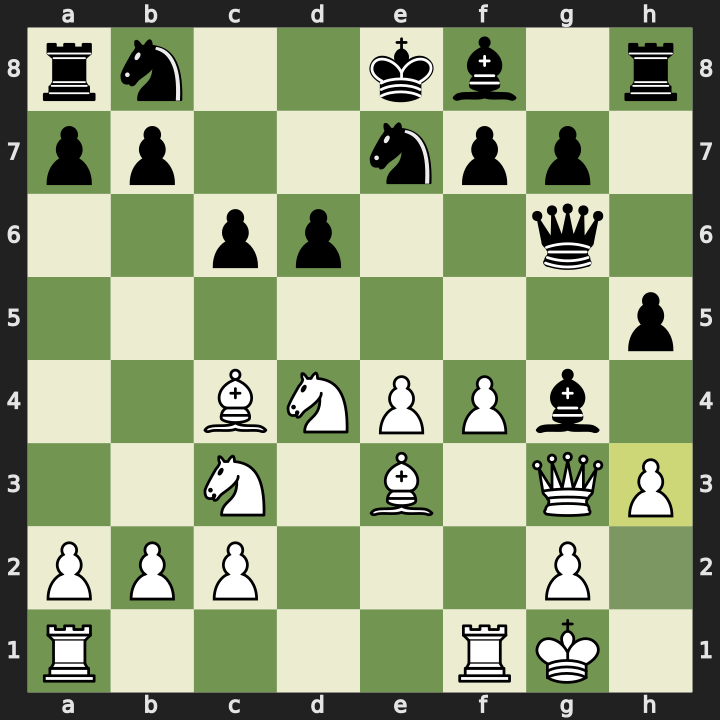
12…Bxh3 13.Qxg6 Nxg6 14.gxh3
I decided to go for a queen trade because I felt that I had much better development and control of the centre. So I still had good chances to win this game even without the queen or a quick checkmate.
We traded, and I grabbed Black’s bishop, which they seemed very happy to sacrifice to open up my king. My king was sitting somewhat exposed on g1, but with no developed minor pieces other than a knight on g6, I wasn’t worried.
The Knight-mare on e6 (Moves 15-18)
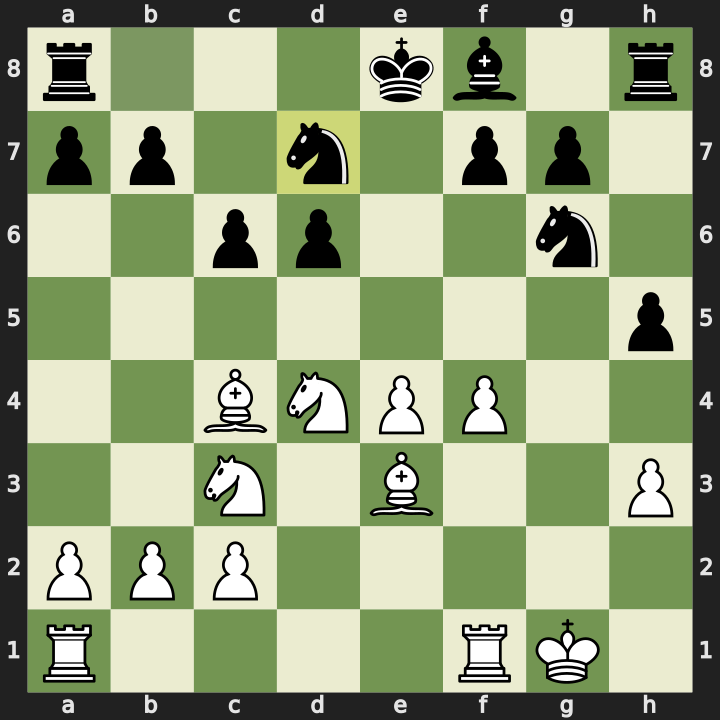
15.f5 Nge5 16.b3 f6 17.Bf4 O-O-O 18.Ne6
I get a knight onto the e6 square where it’s a bit of a knight-mare, as they say, supported by a pawn on f5. So things are looking good. Black is having to defend and I’ve got all this space.
Winning the d-pawn (Moves 18-22)
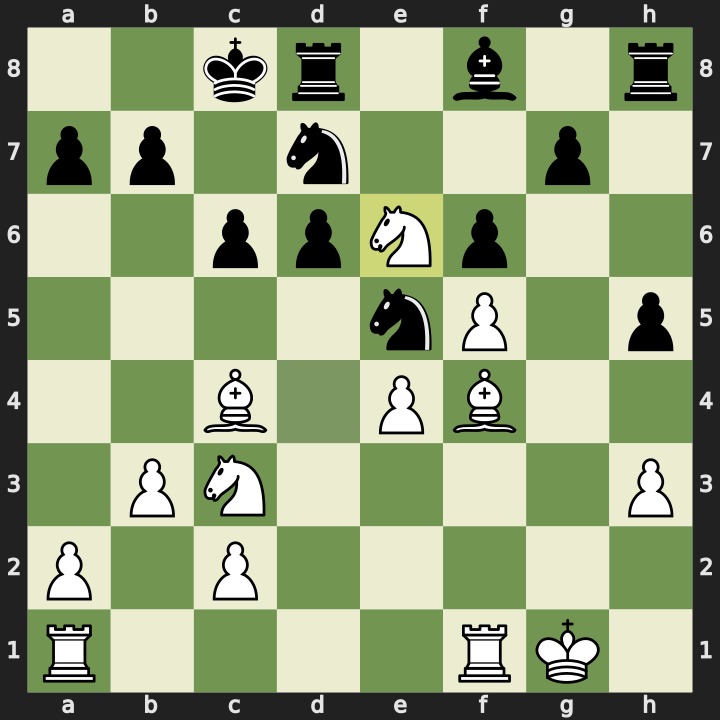
18…Re8 19.Rad1 g5 20.Be3 Kb8 21.Nxf8 Rexf8 22.Rxd6
I removed the defender of the pawn on d6 by taking the bishop on f8. That allowed me to grab it with my rook from d1.
Building Up (Moves 22-24)
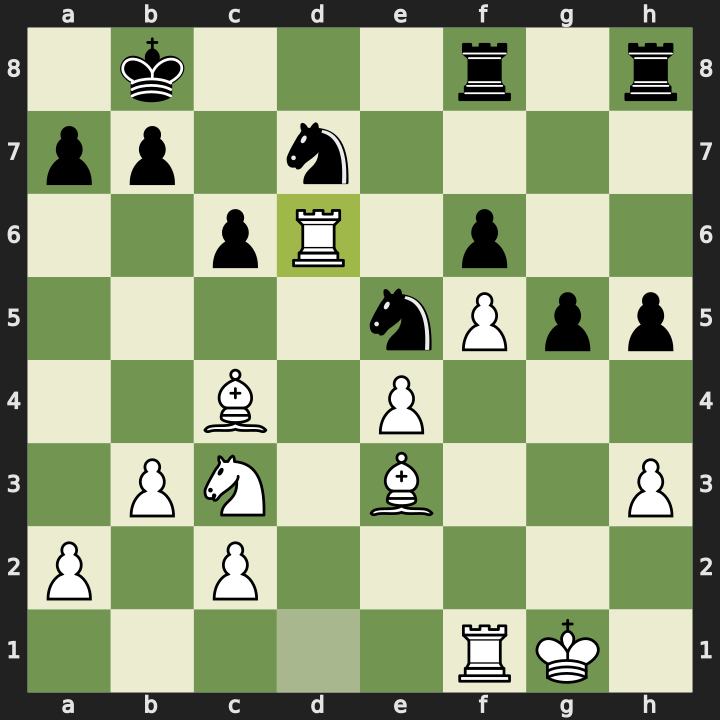
22…g4 23.h4 Rd8 24.Be6
Black pushed 22…g4 at my king, I stopped it with 23.h4, and 24.Be6 put the bishop on the square the knight had been using.
The Critical Moment (Moves 25-27)
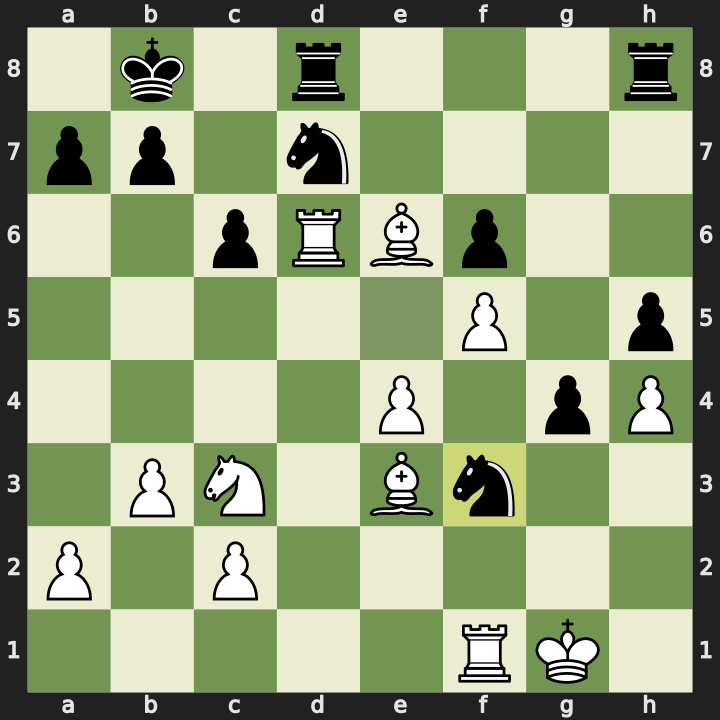
25.Kg2 Nxh4+ 26.Kg3 Nf3 27.Bxd7
A critical moment. Do I move my king, or sacrifice the exchange to take the knight with my rook? I wasn’t sure, and I made the wrong choice. I played 25.Kg2, thinking I should advance my king towards the centre and stop the progression of the g4 pawn.
The Fork (Moves 28-29)
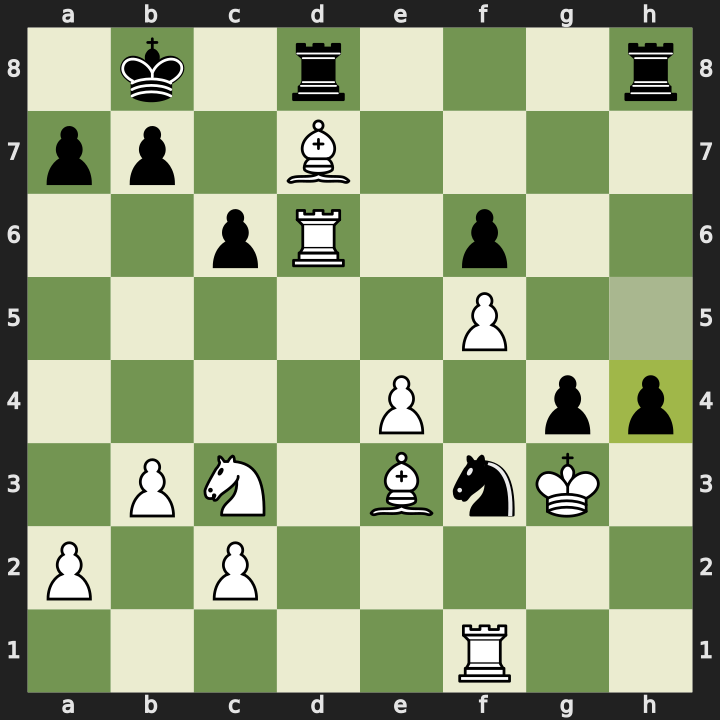
28.Kxg4 Nh2+ 29.Kf4 Nxf1
A few moves later I allowed myself to get forked and ended up losing the rook completely anyway, with only a pawn for compensation.
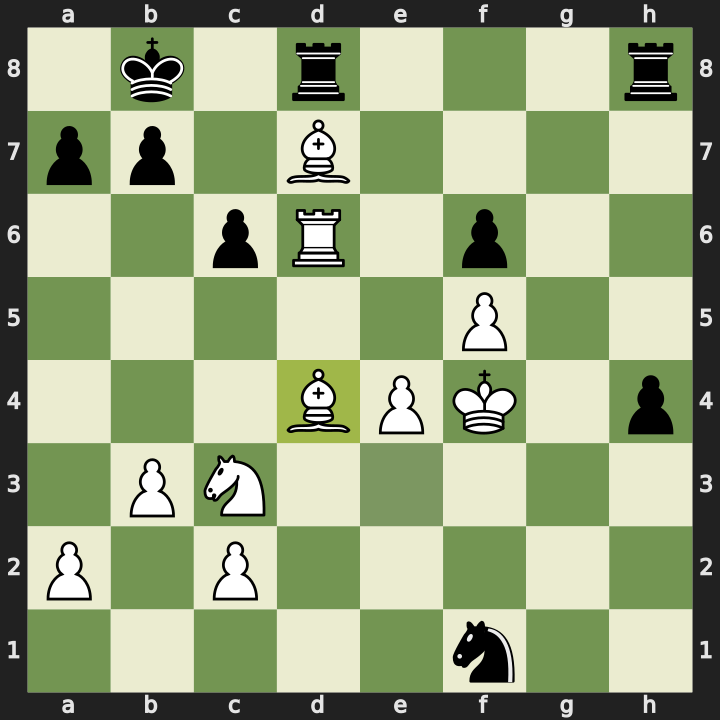
It’s not the end of the world as long as I play the remaining moves precisely. I need to get a bishop to f4 to guard the rook that’s on d6. But I make another mistake. I put my king on f4, blocking the bishop’s path.
Saved by the Bell (Move 30)
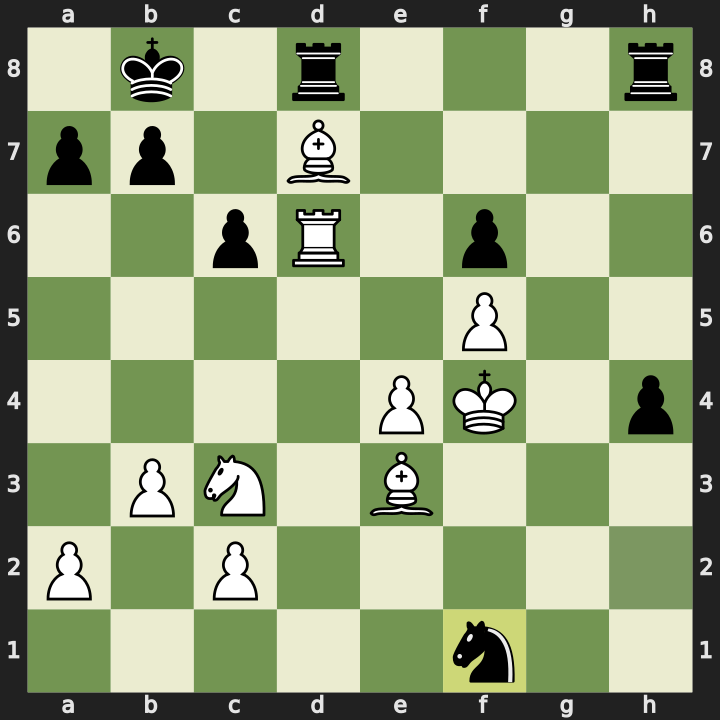
30.Bd4
I moved my bishop to d4, hoping to fork the rooks when I can take on f6. However, the engine shows that after 30.Bd4 Black can play 30…Kc7, attacking my rook and leaving it no retreat down the d-file, because my own bishop is now standing on d4. The rook has to shuffle along the sixth rank, and after 31.Bxf6 Kxd6 I’m down material and likely losing the game.
Luckily for me, my opponent was a careful thinker and had used up a lot of time considering their moves. They lost on time when I’d put my bishop on d4.
I appreciate why they immediately asked for a rematch. They likely could have won the next one, but I wanted to analyse this game and see where I went wrong, because I could tell that I was in a strong position and then it crumbled towards the end.
Engine Review
The main thing I missed was the idea to sacrifice the rook for the knight, because it’s a very interesting line. 25.Rxf3 gxf3 26.Rxd7 Rxd7 27.Bxd7. Stockfish rates it at 6.1 pawns, against 4.6 for the king move I played.
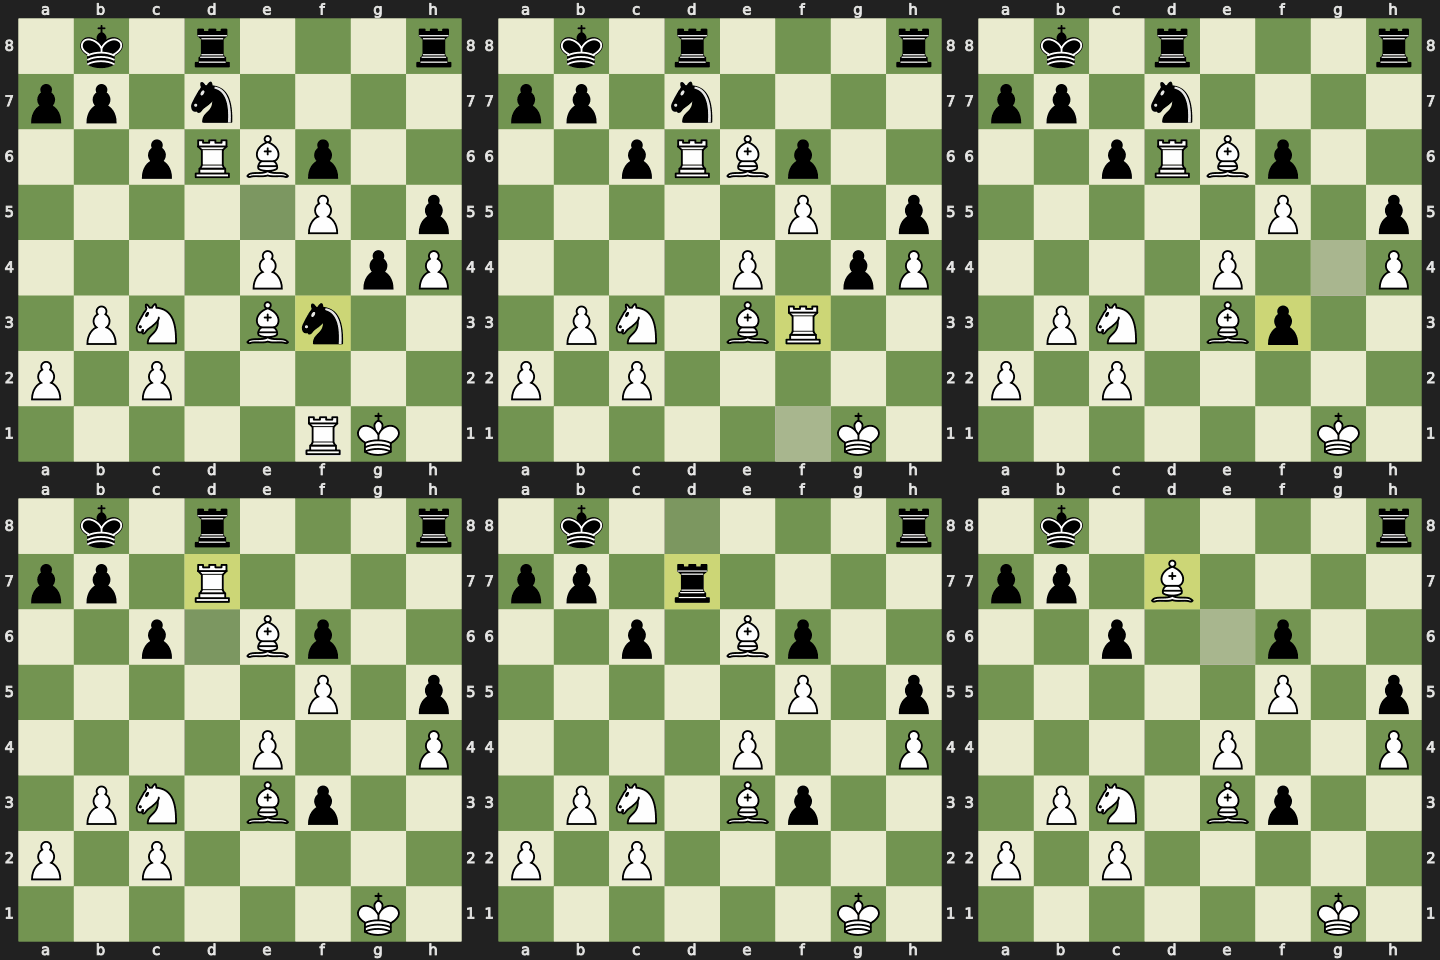
That rook sacrifice wasn’t giving up material at all. I just needed to see that there was a series of exchanges that would take place on f3 and then again on d7, and what would be left afterwards: two bishops and a knight against a single rook, with the pawns level. With plenty of pawns left on the board there would also be chances for promotion.
The second mistake was not seeing how to recover after allowing the knight fork. The important idea is Bf4. On 29.Kh3 Nxf1 30.Bf4 the bishop and the rook on d6 line up on the b8-h2 diagonal against the king on b8, so any rook move becomes a discovered check. Black has to spend a move on 30…Ka8 to defuse it, and then 31.e5 clears the f6 pawn out of the way and the f-pawn runs. Stockfish holds White above five pawns through the whole line.
Instead I played 29.Kf4, which took the evaluation from 5.1 in my favour to level, and then 30.Bd4 turned level into 4.6 against me. The move there was 30.Bf2.
Reflections
What went well:
- The opening and the middlegame. Good time management too.
- Spotting the mate threat on move 9 and answering it with a move that guarded g2 and attacked the bishop at the same time.
- Trading queens on the judgement that I had better development and control of the centre, rather than because the material said to.
What to work on:
- Recognising that sacrificing the exchange can be the best move, especially when it’s part of a sequence.
- Considering the tension across the whole board, and where the position ends up after all of the forcing moves are played.
- Forks. It’s a recurring problem for me. I think I’ve avoided blundering my queen in the last few sessions, but forks are still a blind spot.
Full PGN:
1. e4 e5 2. Nf3 c6 3. d4 exd4 4. Nxd4 Qf6 5. Be3 d6 6. Bc4 h6 7. Nc3 Ne7 8. O-O
Qg6 9. f4 Bh3 10. Qf3 Bg4 11. Qg3 h5 12. h3 Bxh3 13. Qxg6 Nxg6 14. gxh3 Nd7 15.
f5 Nge5 16. b3 f6 17. Bf4 O-O-O 18. Ne6 Re8 19. Rad1 g5 20. Be3 Kb8 21. Nxf8
Rexf8 22. Rxd6 g4 23. h4 Rd8 24. Be6 Nf3+ 25. Kg2 Nxh4+ 26. Kg3 Nf3 27. Bxd7 h4+
28. Kxg4 Nh2+ 29. Kf4 Nxf1 30. Bd4 1-0